
1 Thymeleaf 소개
1.1 Thymeleaf란 무엇인가?
Thymeleaf는 웹 및 독립 실행형 환경 모두를 위한 현대적인 서버 사이드 Java 템플릿 엔진으로, HTML, XML, JavaScript, CSS 및 일반 텍스트까지 처리할 수 있습니다.
Thymeleaf의 주요 목표는 템플릿을 만드는 우아하고 유지보수가 용이한 방법을 제공하는 것입니다. 이를 위해 자연스러운 템플릿 개념을 바탕으로 템플릿 파일에 로직을 주입하되, 템플릿을 디자인 프로토타입으로 사용하는 데 영향을 주지 않는 방식을 채택합니다. 이는 디자인 커뮤니케이션을 개선하고 디자인 팀과 개발 팀 사이의 간격을 좁힙니다.
Thymeleaf는 또한 처음부터 웹 표준 - 특히 HTML5를 염두에 두고 설계되어, 필요한 경우 완전히 유효한 템플릿을 만들 수 있습니다.
1.2 Thymeleaf는 어떤 종류의 템플릿을 처리할 수 있는가?
기본적으로 Thymeleaf는 6가지 종류의 템플릿을 처리할 수 있으며, 각각을 템플릿 모드라고 합니다:
- HTML
- XML
- TEXT
- JAVASCRIPT
- CSS
- RAW
2개의 마크업 템플릿 모드(HTML과 XML), 3개의 텍스트 템플릿 모드(TEXT, JAVASCRIPT, CSS), 그리고 1개의 무작동 템플릿 모드(RAW)가 있습니다.
HTML 템플릿 모드는 HTML5, HTML 4, XHTML을 포함한 모든 종류의 HTML 입력을 허용합니다. 유효성 검사나 형식 검사는 수행되지 않으며, 템플릿 코드/구조는 출력에서 최대한 존중됩니다.
XML 템플릿 모드는 XML 입력을 허용합니다. 이 경우 코드는 잘 형식화되어 있어야 합니다 - 닫히지 않은 태그, 따옴표로 묶이지 않은 속성 등은 허용되지 않으며, 파서는 형식 위반이 발견되면 예외를 던집니다. 단, DTD나 XML 스키마에 대한 유효성 검사는 수행되지 않습니다.
TEXT 템플릿 모드는 마크업이 아닌 성격의 템플릿을 위한 특별한 구문을 사용할 수 있게 합니다. 이러한 템플릿의 예로는 텍스트 이메일이나 템플릿화된 문서가 있을 수 있습니다. HTML이나 XML 템플릿도 TEXT로 처리될 수 있으며, 이 경우 마크업으로 파싱되지 않고 모든 태그, DOCTYPE, 주석 등이 단순 텍스트로 취급됩니다.
JAVASCRIPT 템플릿 모드는 Thymeleaf 애플리케이션에서 JavaScript 파일을 처리할 수 있게 합니다. 이는 HTML 파일에서 할 수 있는 것과 동일한 방식으로 JavaScript 파일 내에서 모델 데이터를 사용할 수 있음을 의미하지만, 특수화된 이스케이핑이나 자연스러운 스크립팅과 같은 JavaScript 특화 통합이 가능합니다. JAVASCRIPT 템플릿 모드는 텍스트 모드로 간주되므로 TEXT 템플릿 모드와 동일한 특수 구문을 사용합니다.
CSS 템플릿 모드는 Thymeleaf 애플리케이션에 관련된 CSS 파일을 처리할 수 있게 합니다. JAVASCRIPT 모드와 유사하게, CSS 템플릿 모드도 텍스트 모드이며 TEXT 템플릿 모드의 특수 처리 구문을 사용합니다.
RAW 템플릿 모드는 단순히 템플릿을 전혀 처리하지 않습니다. 이는 처리되는 템플릿에 변경되지 않은 리소스(파일, URL 응답 등)를 삽입하기 위한 것입니다. 예를 들어, HTML 형식의 외부 제어 불가능한 리소스를 애플리케이션 템플릿에 포함시킬 수 있으며, 이러한 리소스에 포함될 수 있는 Thymeleaf 코드가 실행되지 않을 것임을 안전하게 알 수 있습니다.
1.3 방언: 표준 방언
Thymeleaf는 매우 확장 가능한 템플릿 엔진(사실상 템플릿 엔진 프레임워크라고 불릴 수 있음)으로, 템플릿이 처리되는 방식을 세밀한 수준까지 정의하고 사용자 정의할 수 있습니다.
마크업 아티팩트(태그, 텍스트, 주석, 또는 템플릿이 마크업이 아닌 경우 단순한 자리 표시자)에 일부 로직을 적용하는 객체를 프로세서라고 하며, 이러한 프로세서의 집합 – 아마도 몇 가지 추가 아티팩트와 함께 – 이 일반적으로 방언을 구성합니다. 기본적으로 Thymeleaf의 코어 라이브러리는 표준 방언이라고 불리는 방언을 제공하며, 이는 대부분의 사용자에게 충분할 것입니다.
방언은 실제로 프로세서가 없을 수 있고 완전히 다른 종류의 아티팩트로 구성될 수 있지만, 프로세서가 가장 일반적인 사용 사례입니다.
이 튜토리얼은 표준 방언을 다룹니다. 다음 페이지에서 배우게 될 모든 속성과 구문 기능은 명시적으로 언급되지 않더라도 이 방언에 의해 정의됩니다.
물론 사용자는 라이브러리의 고급 기능을 활용하면서 자신만의 처리 로직을 정의하고 싶다면 자신의 방언을 만들 수 있습니다(표준 방언을 확장하는 것도 포함). Thymeleaf는 또한 여러 방언을 동시에 사용하도록 구성될 수 있습니다.
공식 thymeleaf-spring3 및 thymeleaf-spring4 통합 패키지는 모두 “SpringStandard Dialect”라고 불리는 방언을 정의하는데, 이는 대부분 표준 방언과 동일하지만 Spring Framework의 일부 기능을 더 잘 활용하기 위해 약간의 조정이 이루어졌습니다(예: OGNL 대신 Spring Expression Language 또는 SpringEL 사용). 따라서 Spring MVC 사용자라면 시간을 낭비하고 있는 것이 아닙니다. 여기서 배우는 거의 모든 것이 Spring 애플리케이션에서도 유용할 것입니다.
표준 방언의 대부분의 프로세서는 속성 프로세서입니다. 이를 통해 브라우저는 처리되기 전에도 HTML 템플릿 파일을 올바르게 표시할 수 있습니다. 브라우저는 단순히 추가 속성을 무시하기 때문입니다. 예를 들어, 태그 라이브러리를 사용하는 JSP가 브라우저에서 직접 표시할 수 없는 코드 조각을 포함할 수 있는 반면:
<form:inputText name="userName" value="${user.name}" />…Thymeleaf 표준 방언을 사용하면 동일한 기능을 다음과 같이 구현할 수 있습니다:
<input
  type="text"
  name="userName"
  value="James Carrot"
  th:value="${user.name}"
/>
이는 브라우저에서 올바르게 표시될 뿐만 아니라, 프로토타입이 정적으로 브라우저에서 열렸을 때 표시될 값 속성을 (선택적으로) 지정할 수 있게 해줍니다(“James Carrot”, 이 경우). 이 값은 템플릿 처리 중 ${user.name} 평가 결과로 대체될 것입니다.
이는 디자이너와 개발자가 동일한 템플릿 파일에서 작업할 수 있게 하고, 정적 프로토타입을 작동하는 템플릿 파일로 변환하는 데 필요한 노력을 줄입니다. 이렇게 할 수 있는 능력을 자연스러운 템플릿 작성이라고 합니다.
2 The Good Thymes 가상 식료품점
이 가이드의 현재 및 향후 장에서 보여지는 예제의 소스 코드는 두 가지 (동등한) 버전의 Good Thymes 가상 식료품점 (GTVG) 예제 앱에서 찾을 수 있습니다:
javax.*기반: gtvg-javax.jakarta.*기반: gtvg-jakarta.
2.1 식료품점을 위한 웹사이트
Thymeleaf로 템플릿을 처리하는 데 관련된 개념을 더 잘 설명하기 위해, 이 튜토리얼에서는 프로젝트 웹사이트에서 다운로드할 수 있는 데모 애플리케이션을 사용할 것입니다.
이 애플리케이션은 가상의 온라인 식료품점 웹사이트로, Thymeleaf의 다양한 기능을 보여주는 많은 시나리오를 제공할 것입니다.
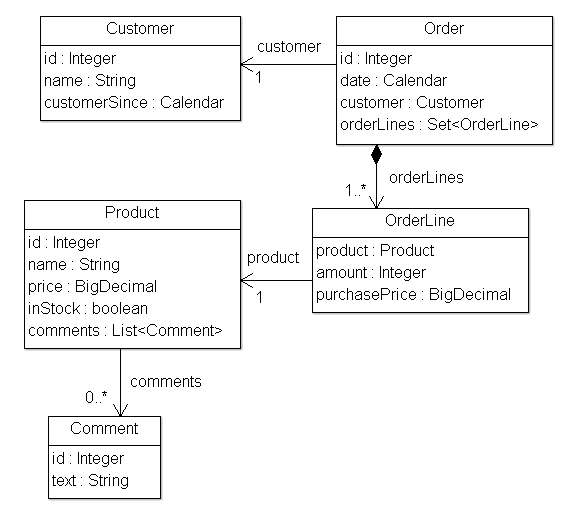
시작하기 위해, 우리는 애플리케이션을 위한 간단한 모델 엔티티 세트가 필요합니다: 고객에게 판매되는 제품들로 주문을 생성합니다. 또한 이러한 제품에 대한 댓글도 관리할 것입니다:
우리의 애플리케이션은 또한 다음과 같은 메서드를 포함하는 Service 객체로 구성된 매우 간단한 서비스 계층을 가질 것입니다:
public class ProductService {

    ...

    public List<Product> findAll() {
        return ProductRepository.getInstance().findAll();
    }

    public Product findById(Integer id) {
        return ProductRepository.getInstance().findById(id);
    }

}
웹 계층에서 우리의 애플리케이션은 요청 URL에 따라 Thymeleaf 지원 명령에 실행을 위임하는 필터를 가질 것입니다:
/*
 * 애플리케이션 객체를 먼저 선언해야 합니다 (IWebApplication 구현).
 * 이 경우, Jakarta 기반 버전을 사용합니다.
 */
public void init(final FilterConfig filterConfig) throws ServletException {
    this.application =
            JakartaServletWebApplication.buildApplication(
                filterConfig.getServletContext());
    // TemplateEngine 객체가 어떻게 구성되는지 나중에 보겠습니다.
    this.templateEngine = buildTemplateEngine(this.application);
}

/*
 * 각 요청은 교환 객체를 생성하여 처리됩니다 (요청, 응답 및 이 과정에 필요한 모든 데이터를 모델링).
 * 그런 다음 해당 컨트롤러를 호출합니다.
 */
private boolean process(HttpServletRequest request, HttpServletResponse response)
        throws ServletException {

    try {

        final IWebExchange webExchange =
            this.application.buildExchange(request, response);
        final IWebRequest webRequest = webExchange.getRequest();

        // 리소스 URL에 대한 엔진 실행을 방지합니다.
        if (request.getRequestURI().startsWith("/css") ||
                request.getRequestURI().startsWith("/images") ||
                request.getRequestURI().startsWith("/favicon")) {
            return false;
        }

        /*
         * 컨트롤러/URL 매핑을 쿼리하고 요청을 처리할 컨트롤러를 얻습니다.
         * 컨트롤러가 없으면 false를 반환하고 다른 필터/서블릿이 요청을 처리하도록 합니다.
         */
        final IGTVGController controller =
            ControllerMappings.resolveControllerForRequest(webRequest);
        if (controller == null) {
            return false;
        }

        /*
         * 응답 헤더를 작성합니다.
         */
        response.setContentType("text/html;charset=UTF-8");
        response.setHeader("Pragma", "no-cache");
        response.setHeader("Cache-Control", "no-cache");
        response.setDateHeader("Expires", 0);

        /*
         * 응답 작성을 위한 Writer 객체를 얻습니다.
         */
        final Writer writer = response.getWriter();

        /*
         * 컨트롤러를 실행하고 뷰 템플릿을 처리하여
         * 결과를 응답 작성자에게 씁니다.
         */
        controller.process(webExchange, this.templateEngine, writer);

        return true;

    } catch (Exception e) {
        try {
            response.sendError(HttpServletResponse.SC_INTERNAL_SERVER_ERROR);
        } catch (final IOException ignored) {
            // 무시합니다.
        }
        throw new ServletException(e);
    }

}
이것이 우리의 IGTVGController 인터페이스입니다:
public interface IGTVGController {

    public void process(
            final IWebExchange webExchange,
            final ITemplateEngine templateEngine,
            final Writer writer)
            throws Exception;

}
이제 우리가 해야 할 일은 IGTVGController 인터페이스의 구현을 만들고, 서비스에서 데이터를 검색하고 ITemplateEngine 객체를 사용하여 템플릿을 처리하는 것입니다.
결국, 다음과 같이 보일 것입니다:

하지만 먼저 템플릿 엔진이 어떻게 초기화되는지 살펴보겠습니다.
2.2 템플릿 엔진 생성 및 구성
우리 필터의 init(…) 메서드에는 다음 줄이 포함되어 있었습니다:
this.templateEngine = buildTemplateEngine(this.application);이제 org.thymeleaf.TemplateEngine 객체가 어떻게 초기화되는지 살펴보겠습니다:
private static ITemplateEngine buildTemplateEngine(final IWebApplication application) {

    // 템플릿은 애플리케이션(ServletContext) 리소스로 해석됩니다.
    final WebApplicationTemplateResolver templateResolver =
            new WebApplicationTemplateResolver(application);

    // HTML은 기본 모드지만, 코드 이해를 돕기 위해 설정합니다.
    templateResolver.setTemplateMode(TemplateMode.HTML);
    // "home"을 "/WEB-INF/templates/home.html"로 변환합니다.
    templateResolver.setPrefix("/WEB-INF/templates/");
    templateResolver.setSuffix(".html");
    // 템플릿 캐시 TTL을 1시간으로 설정합니다. 설정하지 않으면 LRU에 의해 제거될 때까지 캐시에 남아 있습니다.
    templateResolver.setCacheTTLMs(Long.valueOf(3600000L));

    // 캐시는 기본적으로 true로 설정됩니다. 수정 시 템플릿을 자동으로 업데이트하려면 false로 설정합니다.
    templateResolver.setCacheable(true);

    final TemplateEngine templateEngine = new TemplateEngine();
    templateEngine.setTemplateResolver(templateResolver);

    return templateEngine;
}
TemplateEngine 객체를 구성하는 방법은 많지만, 지금은 이 몇 줄의 코드로 필요한 단계에 대해 충분히 배울 수 있습니다.
템플릿 리졸버
템플릿 리졸버부터 시작해 봅시다:
final WebApplicationTemplateResolver templateResolver =
        new WebApplicationTemplateResolver(application);
템플릿 리졸버는 Thymeleaf API의 org.thymeleaf.templateresolver.ITemplateResolver 인터페이스를 구현하는 객체입니다:
public interface ITemplateResolver {

    ...

    /*
     * 템플릿은 이름(또는 내용)으로 해석되며, 다른 템플릿의 일부를 해석하려는 경우
     * (선택적으로) 소유자 템플릿도 포함됩니다.
     * 이 템플릿 리졸버에서 템플릿을 처리할 수 없는 경우 null을 반환합니다.
     */
    public TemplateResolution resolveTemplate(
            final IEngineConfiguration configuration,
            final String ownerTemplate, final String template,
            final Map<String, Object> templateResolutionAttributes);
}
이 객체들은 템플릿에 어떻게 접근할 것인지를 결정하는 역할을 합니다. 이 GTVG 애플리케이션에서 org.thymeleaf.templateresolver.WebApplicationTemplateResolver의 사용은 우리가 템플릿 파일을 IWebApplication 객체의 리소스로 검색할 것임을 의미합니다: 이는 Thymeleaf의 추상화로, 서블릿 기반 애플리케이션에서 기본적으로 서블릿 API의 [javax|jakarta].servlet.ServletContext 객체를 감싸고 웹 애플리케이션 루트에서 리소스를 해결합니다.
하지만 템플릿 리졸버에 대해 말할 수 있는 것은 이것만이 아닙니다. 우리는 여기에 몇 가지 구성 매개변수를 설정할 수 있습니다. 먼저, 템플릿 모드:
templateResolver.setTemplateMode(TemplateMode.HTML);HTML은 WebApplicationTemplateResolver의 기본 템플릿 모드이지만, 우리의 코드가 무슨 일이 일어나고 있는지 명확하게 문서화하도록 어쨌든 이를 설정하는 것이 좋습니다.
templateResolver.setPrefix("/WEB-INF/templates/");
templateResolver.setSuffix(".html");
prefix 와 suffix 는 우리가 실제 리소스 이름을 얻기 위해 엔진에 전달할 템플릿 이름을 수정합니다.
이 구성을 사용하면 템플릿 이름 “product/list” 는 다음에 해당합니다:
servletContext.getResourceAsStream("/WEB-INF/templates/product/list.html")선택적으로, 파싱된 템플릿이 캐시에 살아있을 수 있는 시간은 템플릿 리졸버의 cacheTTLMs 속성으로 구성됩니다:
templateResolver.setCacheTTLMs(3600000L); // 1시간템플릿은 여전히 TTL에 도달하기 전에 캐시에서 제거될 수 있습니다. 최대 캐시 크기에 도달하고 현재 캐시된 항목 중 가장 오래된 경우에 그렇습니다.
캐시 동작과 크기는 사용자가
ICacheManager인터페이스를 구현하거나 기본 캐시를 관리하는StandardCacheManager객체를 수정하여 정의할 수 있습니다.
템플릿 리졸버에 대해 배울 것이 더 많지만, 지금은 템플릿 엔진 객체의 생성을 살펴보겠습니다.
템플릿 엔진
템플릿 엔진 객체는 org.thymeleaf.ITemplateEngine 인터페이스의 구현입니다. Thymeleaf 코어는 이러한 구현 중 하나를 제공합니다: org.thymeleaf.TemplateEngine, 우리는 여기서 그것의 인스턴스를 생성합니다:
templateEngine = new TemplateEngine();
templateEngine.setTemplateResolver(templateResolver);
꽤 간단하지 않나요? 우리가 필요한 것은 인스턴스를 생성하고 템플릿 리졸버를 설정하는 것뿐입니다.
템플릿 리졸버는 TemplateEngine이 필요로 하는 유일한 필수 매개변수이지만, 나중에 다룰 다른 많은 것들이 있습니다(메시지 리졸버, 캐시 크기 등). 지금은 이것이 우리가 필요한 전부입니다.
이제 우리의 템플릿 엔진이 준비되었고 Thymeleaf를 사용하여 페이지를 만들기 시작할 수 있습니다.
3 텍스트 사용하기
3.1 다국어 환영 메시지
우리의 첫 번째 작업은 식료품점 사이트를 위한 홈페이지를 만드는 것입니다.
이 페이지의 첫 번째 버전은 매우 간단할 것입니다: 단지 제목과 환영 메시지만 있습니다. 이것이 우리의 /WEB-INF/templates/home.html 파일입니다:
<!DOCTYPE html>

<html xmlns:th="http://www.thymeleaf.org">
  <head>
    <title>Good Thymes Virtual Grocery</title>
    <meta http-equiv="Content-Type" content="text/html; charset=UTF-8" />
    <link
      rel="stylesheet"
      type="text/css"
      media="all"
      href="../../css/gtvg.css"
      th:href="@{/css/gtvg.css}"
    />
  </head>

  <body>
    <p th:text="#{home.welcome}">Welcome to our grocery store!</p>
  </body>
</html>
가장 먼저 눈에 띄는 것은 이 파일이 HTML5라는 점입니다. 비 HTML 태그를 포함하지 않기 때문에 모든 브라우저에서 올바르게 표시될 수 있습니다(브라우저는 이해하지 못하는 모든 속성을 무시합니다, 예를 들어 th:text와 같은 것들).
하지만 이 템플릿이 실제로 유효한 HTML5 문서가 아니라는 것을 알 수 있습니다. 우리가 th:* 형태로 사용하고 있는 이 비표준 속성들은 HTML5 명세에서 허용되지 않기 때문입니다. 실제로, 우리는 심지어 <html> 태그에 xmlns:th 속성을 추가하고 있습니다. 이는 전혀 HTML5스럽지 않습니다:
<html xmlns:th="http://www.thymeleaf.org"></html>…이는 템플릿 처리에 전혀 영향을 미치지 않지만, IDE가 모든 th:* 속성에 대한 네임스페이스 정의 부재에 대해 불평하는 것을 방지하는 주문 역할을 합니다.
그렇다면 이 템플릿을 HTML5-유효하게 만들고 싶다면 어떻게 해야 할까요? 간단합니다: Thymeleaf의 데이터 속성 구문으로 전환하면 됩니다. 속성 이름에 data- 접두사를 사용하고 세미콜론(:) 대신 하이픈(-) 구분자를 사용합니다:
<!DOCTYPE html>

<html>
  <head>
    <title>Good Thymes Virtual Grocery</title>
    <meta http-equiv="Content-Type" content="text/html; charset=UTF-8" />
    <link
      rel="stylesheet"
      type="text/css"
      media="all"
      href="../../css/gtvg.css"
      data-th-href="@{/css/gtvg.css}"
    />
  </head>

  <body>
    <p data-th-text="#{home.welcome}">Welcome to our grocery store!</p>
  </body>
</html>
사용자 정의 data- 접두사가 붙은 속성은 HTML5 명세에서 허용되므로, 위의 코드로 우리의 템플릿은 유효한 HTML5 문서가 될 것입니다.
두 표기법은 완전히 동등하고 서로 교환 가능하지만, 코드 샘플의 단순성과 간결성을 위해 이 튜토리얼에서는 네임스페이스 표기법(
th:*)을 사용할 것입니다. 또한,th:*표기법은 더 일반적이며 모든 Thymeleaf 템플릿 모드(XML,TEXT…)에서 허용되는 반면,data-표기법은HTML모드에서만 허용됩니다.
th:text 사용 및 텍스트 외부화
텍스트 외부화는 템플릿 파일에서 템플릿 코드 조각을 추출하여 별도의 파일(일반적으로 .properties 파일)에 보관하고, 다른 언어로 작성된 동등한 텍스트로 쉽게 대체할 수 있도록 하는 것입니다(이 과정을 국제화 또는 간단히 i18n이라고 합니다). 외부화된 텍스트 조각은 보통 “메시지”라고 불립니다.
메시지에는 항상 그것을 식별하는 키가 있으며, Thymeleaf는 #{...} 구문을 사용하여 텍스트가 특정 메시지에 해당해야 함을 지정할 수 있게 합니다:
<p th:text="#{home.welcome}">Welcome to our grocery store!</p>여기서 우리가 볼 수 있는 것은 사실 Thymeleaf 표준 방언의 두 가지 다른 기능입니다:
th:text속성은 그 값 표현식을 평가하고 결과를 호스트 태그의 본문으로 설정하여, 코드에서 볼 수 있는 “Welcome to our grocery store!” 텍스트를 효과적으로 대체합니다.- 표준 표현식 구문에 지정된
#{home.welcome}표현식은th:text속성이 사용해야 할 텍스트가 우리가 템플릿을 처리하고 있는 로케일에 해당하는home.welcome키를 가진 메시지여야 함을 지시합니다.
그렇다면, 이 외부화된 텍스트는 어디에 있을까요?
Thymeleaf에서 외부화된 텍스트의 위치는 완전히 구성 가능하며, 사용 중인 특정 org.thymeleaf.messageresolver.IMessageResolver 구현에 따라 달라집니다. 일반적으로 .properties 파일을 기반으로 한 구현이 사용되지만, 예를 들어 데이터베이스에서 메시지를 가져오기 위해 우리만의 구현을 만들 수도 있습니다.
그러나 우리는 초기화 중에 템플릿 엔진에 대한 메시지 리졸버를 지정하지 않았으며, 이는 우리의 애플리케이션이 org.thymeleaf.messageresolver.StandardMessageResolver에 의해 구현된 표준 메시지 리졸버를 사용하고 있다는 것을 의미합니다.
표준 메시지 리졸버는 /WEB-INF/templates/home.html에 대한 메시지를 같은 폴더에 있고 템플릿과 같은 이름을 가진 properties 파일에서 찾을 것으로 예상합니다. 예를 들어:
/WEB-INF/templates/home_en.properties영어 텍스트용/WEB-INF/templates/home_es.properties스페인어 텍스트용/WEB-INF/templates/home_pt_BR.properties포르투갈어(브라질) 텍스트용/WEB-INF/templates/home.properties기본 텍스트용(로케일이 일치하지 않는 경우)
우리의 home_es.properties 파일을 살펴봅시다:
home.welcome=¡Bienvenido a nuestra tienda de comestibles!이것이 Thymeleaf가 우리의 템플릿을 처리하는 데 필요한 전부입니다. 그럼 이제 Home 컨트롤러를 만들어 봅시다.
컨텍스트
템플릿을 처리하기 위해, 우리는 이전에 보았던 IGTVGController 인터페이스를 구현하는 HomeController 클래스를 만들 것입니다:
public class HomeController implements IGTVGController {

    public void process(
            final IWebExchange webExchange,
            final ITemplateEngine templateEngine,
            final Writer writer)
            throws Exception {

        WebContext ctx = new WebContext(webExchange, webExchange.getLocale());

        templateEngine.process("home", ctx, writer);

    }

}
우리가 가장 먼저 볼 수 있는 것은 컨텍스트의 생성입니다. Thymeleaf 컨텍스트는 org.thymeleaf.context.IContext 인터페이스를 구현하는 객체입니다. 컨텍스트는 변수 맵에 템플릿 엔진의 실행에 필요한 모든 데이터를 포함해야 하며, 또한 외부화된 메시지에 사용되어야 하는 로케일을 참조해야 합니다.
public interface IContext {

    public Locale getLocale();
    public boolean containsVariable(final String name);
    public Set<String> getVariableNames();
    public Object getVariable(final String name);

}
이 인터페이스의 특수화된 상속(extends)인 org.thymeleaf.context.IWebContext는 웹 애플리케이션에서 사용하기 위한 것입니다.
public interface IWebContext extends IContext {

    public IWebExchange getExchange();

}
Thymeleaf 코어 라이브러리는 이러한 각 인터페이스의 구현을 제공합니다:
org.thymeleaf.context.Context는IContext를 구현합니다org.thymeleaf.context.WebContext는IWebContext를 구현합니다
그리고 컨트롤러 코드에서 볼 수 있듯이, 우리가 사용하는 것은 WebContext입니다. 사실 우리는 그렇게 해야 합니다. WebApplicationTemplateResolver의 사용은 IWebContext를 구현하는 컨텍스트를 사용해야 하기 때문입니다.
WebContext ctx = new WebContext(webExchange, webExchange.getLocale());WebContext 생성자는 이 웹 기반 교환(즉, 요청 + 응답)을 나타내는 필터에서 생성된 IWebExchange 추상화 객체에 포함된 정보를 필요로 합니다. 지정되지 않은 경우 시스템의 기본 로케일이 사용됩니다(실제 애플리케이션에서는 이런 일이 절대 일어나지 않도록 해야 합니다).
템플릿에서 WebContext로부터 요청 파라미터와 요청, 세션 및 애플리케이션 속성을 얻기 위해 사용할 수 있는 몇 가지 특수한 표현식이 있습니다. 예를 들어:
${x}는 Thymeleaf 컨텍스트에 저장되거나 교환 속성(서블릿 용어로 “요청 속성”)으로 저장된 변수x를 반환합니다.${param.x}는x라는 요청 파라미터를 반환합니다(다중 값일 수 있음).${session.x}는x라는 세션 속성을 반환합니다.${application.x}는x라는 애플리케이션 속성을 반환합니다(서블릿 용어로 “서블릿 컨텍스트 속성”).
템플릿 엔진 실행
컨텍스트 객체가 준비되었으므로, 이제 템플릿 엔진에게 컨텍스트를 사용하여 템플릿(이름으로)을 처리하고, 응답이 작성될 수 있도록 응답 작성기를 전달하라고 지시할 수 있습니다:
templateEngine.process("home", ctx, writer);스페인어 로케일을 사용하여 이 결과를 봅시다:
<!DOCTYPE html>

<html>
  <head>
    <title>Good Thymes Virtual Grocery</title>
    <meta content="text/html; charset=UTF-8" http-equiv="Content-Type" />
    <link
      rel="stylesheet"
      type="text/css"
      media="all"
      href="/gtvg/css/gtvg.css"
    />
  </head>

  <body>
    <p>¡Bienvenido a nuestra tienda de comestibles!</p>
  </body>
</html>
3.2 텍스트와 변수에 대한 추가 정보
이스케이프되지 않은 텍스트
우리의 홈 페이지의 가장 간단한 버전이 이제 준비된 것 같지만, 우리가 생각하지 못한 것이 있습니다… 만약 우리가 이런 메시지를 가지고 있다면 어떨까요?
home.welcome=Welcome to our <b>fantastic</b> grocery store!이 템플릿을 이전처럼 실행하면, 다음과 같은 결과를 얻게 됩니다:
<p>Welcome to our <b>fantastic</b> grocery store!</p>이는 우리가 기대한 것과 정확히 일치하지 않습니다. 왜냐하면 우리의 <b> 태그가 이스케이프되어 브라우저에 그대로 표시될 것이기 때문입니다.
이것이 th:text 속성의 기본 동작입니다. Thymeleaf가 우리의 HTML 태그를 존중하고 이스케이프하지 않기를 원한다면, 우리는 다른 속성을 사용해야 합니다: th:utext (“이스케이프되지 않은 텍스트”를 의미합니다):
<p th:utext="#{home.welcome}">Welcome to our grocery store!</p>이렇게 하면 우리가 원하는 대로 메시지가 출력될 것입니다:
<p>Welcome to our <b>fantastic</b> grocery store!</p>변수 사용 및 표시
이제 우리의 홈 페이지에 더 많은 내용을 추가해 봅시다. 예를 들어, 환영 메시지 아래에 날짜를 표시하고 싶을 수 있습니다, 이렇게요:
Welcome to our fantastic grocery store!

Today is: 12 july 2010
우선, 우리는 날짜를 컨텍스트 변수로 추가하기 위해 컨트롤러를 수정해야 합니다:
public void process(
        final IWebExchange webExchange,
        final ITemplateEngine templateEngine,
        final Writer writer)
        throws Exception {

    SimpleDateFormat dateFormat = new SimpleDateFormat("dd MMMM yyyy");
    Calendar cal = Calendar.getInstance();

    WebContext ctx = new WebContext(webExchange, webExchange.getLocale());
    ctx.setVariable("today", dateFormat.format(cal.getTime()));

    templateEngine.process("home", ctx, writer);

}
우리는 today라는 String 변수를 컨텍스트에 추가했고, 이제 우리는 이를 템플릿에 표시할 수 있습니다:
<body>
  <p th:utext="#{home.welcome}">Welcome to our grocery store!</p>

  <p>Today is: <span th:text="${today}">13 February 2011</span></p>
</body>
보시다시피, 우리는 여전히 th:text 속성을 사용하고 있습니다(그리고 이는 올바릅니다. 왜냐하면 우리는 태그의 본문을 대체하기를 원하기 때문입니다). 하지만 이번에는 구문이 조금 다릅니다. #{...} 표현식 값 대신 ${...} 표현식을 사용하고 있습니다. 이것은 변수 표현식이며, OGNL(Object-Graph Navigation Language)이라는 언어로 작성된 표현식을 포함하고 있습니다. 이 표현식은 우리가 이전에 언급한 컨텍스트 변수 맵에서 실행될 것입니다.
${today} 표현식은 단순히 “today라는 변수를 가져오라”는 의미이지만, 이러한 표현식은 더 복잡할 수 있습니다(예: ${user.name}은 “user라는 변수를 가져와서 그것의 getName() 메소드를 호출하라”는 의미입니다).
속성 값에는 꽤 많은 가능성이 있습니다: 메시지, 변수 표현식… 그리고 훨씬 더 많습니다. 다음 장에서는 이 모든 가능성이 무엇인지 살펴볼 것입니다.
4 표준 표현식 구문
우리의 가상 식료품점 개발을 잠시 중단하고 Thymeleaf 표준 방언의 가장 중요한 부분 중 하나인 Thymeleaf 표준 표현식 구문에 대해 알아보겠습니다.
우리는 이미 이 구문으로 표현된 두 가지 유형의 유효한 속성 값을 보았습니다: 메시지 표현식과 변수 표현식입니다:
<p th:utext="#{home.welcome}">Welcome to our grocery store!</p>

<p>Today is: <span th:text="${today}">13 february 2011</span></p>
하지만 더 많은 종류의 표현식이 있고, 우리가 이미 알고 있는 것들에 대해 더 흥미로운 세부 사항을 배울 수 있습니다. 먼저, 표준 표현식 기능에 대한 간단한 요약을 살펴보겠습니다:
- 단순 표현식:
- 변수 표현식:
${...} - 선택 변수 표현식:
*{...} - 메시지 표현식:
#{...} - 링크 URL 표현식:
@{...} - 프래그먼트 표현식:
~{...}
- 변수 표현식:
- 리터럴
- 텍스트 리터럴:
'one text','Another one!',… - 숫자 리터럴:
0,34,3.0,12.3,… - 불리언 리터럴:
true,false - Null 리터럴:
null - 리터럴 토큰:
one,sometext,main,…
- 텍스트 리터럴:
- 텍스트 연산:
- 문자열 연결:
+ - 리터럴 대체:
|The name is ${name}|
- 문자열 연결:
- 산술 연산:
- 이항 연산자:
+,-,*,/,% - 마이너스 부호 (단항 연산자):
-
- 이항 연산자:
- 불리언 연산:
- 이항 연산자:
and,or - 불리언 부정 (단항 연산자):
!,not
- 이항 연산자:
- 비교 및 동등성:
- 비교 연산자:
>,<,>=,<=(gt,lt,ge,le) - 동등성 연산자:
==,!=(eq,ne)
- 비교 연산자:
- 조건 연산자:
- If-then:
(if) ? (then) - If-then-else:
(if) ? (then) : (else) - 기본값:
(value) ?: (defaultvalue)
- If-then:
- 특수 토큰:
- 무연산:
_
- 무연산:
이 모든 기능은 조합하고 중첩할 수 있습니다:
'User is of type ' + (${user.isAdmin()} ? 'Administrator' : (${user.type} ?:
'Unknown'))
4.1 메시지
우리가 이미 알고 있듯이, #{...} 메시지 표현식을 사용하면 다음과 같이 연결할 수 있습니다:
<p th:utext="#{home.welcome}">Welcome to our grocery store!</p>…여기에:
home.welcome=¡Bienvenido a nuestra tienda de comestibles!하지만 우리가 아직 생각하지 못한 한 가지 측면이 있습니다: 메시지 텍스트가 완전히 정적이지 않다면 어떻게 될까요? 예를 들어, 우리 애플리케이션이 언제든지 사이트를 방문하는 사용자가 누구인지 알고 있고 그들의 이름으로 인사하고 싶다면 어떨까요?
<p>¡Bienvenido a nuestra tienda de comestibles, John Apricot!</p>이는 우리가 메시지에 매개변수를 추가해야 한다는 것을 의미합니다. 다음과 같이:
home.welcome=¡Bienvenido a nuestra tienda de comestibles, {0}!매개변수는 java.text.MessageFormat 표준 구문에 따라 지정됩니다. 이는 java.text.* 패키지의 클래스에 대한 API 문서에 명시된 대로 숫자와 날짜를 포맷할 수 있음을 의미합니다.
매개변수 값을 지정하기 위해, user라는 HTTP 세션 속성이 주어졌다고 가정하면 다음과 같이 할 수 있습니다:
<p th:utext="#{home.welcome(${session.user.name})}">
  Welcome to our grocery store, Sebastian Pepper!
</p>
여기서
th:utext를 사용한다는 것은 포맷된 메시지가 이스케이프되지 않을 것임을 의미합니다. 이 예제는user.name이 이미 이스케이프되었다고 가정합니다.
여러 매개변수를 지정할 수 있으며, 쉼표로 구분합니다.
메시지 키 자체가 변수에서 올 수 있습니다:
<p th:utext="#{${welcomeMsgKey}(${session.user.name})}">
  Welcome to our grocery store, Sebastian Pepper!
</p>
4.2 변수
우리는 이미 ${...} 표현식이 사실 컨텍스트에 포함된 변수 맵에서 실행되는 OGNL(Object-Graph Navigation Language) 표현식이라고 언급했습니다.
OGNL 구문과 기능에 대한 자세한 정보는 OGNL Language Guide를 읽어보세요.
Spring MVC 지원 애플리케이션에서는 OGNL이 SpringEL로 대체되지만, 그 구문은 OGNL과 매우 유사합니다(실제로 대부분의 일반적인 경우에는 정확히 같습니다).
OGNL의 구문에서, 우리는 다음의 표현식이:
<p>Today is: <span th:text="${today}">13 february 2011</span>.</p>…사실 다음과 동등하다는 것을 알 수 있습니다:
ctx.getVariable("today");하지만 OGNL을 사용하면 더 강력한 표현식을 만들 수 있으며, 그래서 다음과 같은 것이:
<p th:utext="#{home.welcome(${session.user.name})}">
  Welcome to our grocery store, Sebastian Pepper!
</p>
…다음을 실행하여 사용자 이름을 얻습니다:
((User) ctx.getVariable("session").get("user")).getName();하지만 getter 메서드 탐색은 OGNL의 기능 중 하나일 뿐입니다. 더 많은 기능을 살펴보겠습니다:
/*
 * 점(.)을 사용한 속성 접근. 속성 getter 호출과 동등합니다.
 */
${person.father.name}

/*
 * 속성 접근은 대괄호([])를 사용하고 속성 이름을 변수로 또는 작은따옴표 사이에 작성하여 수행할 수도 있습니다.
 */
${person['father']['name']}

/*
 * 객체가 맵인 경우, 점 표기법과 대괄호 표기법 모두 get(...) 메서드 호출과 동등합니다.
 */
${countriesByCode.ES}
${personsByName['Stephen Zucchini'].age}

/*
 * 배열이나 컬렉션의 인덱스 접근도 대괄호를 사용하며, 인덱스는 따옴표 없이 작성합니다.
 */
${personsArray[0].name}

/*
 * 인수를 포함하여 메서드를 호출할 수 있습니다.
 */
${person.createCompleteName()}
${person.createCompleteNameWithSeparator('-')}
표현식 기본 객체
컨텍스트 변수에서 OGNL 표현식을 평가할 때, 더 높은 유연성을 위해 일부 객체가 표현식에 제공됩니다. 이러한 객체는 (OGNL 표준에 따라) # 기호로 시작하여 참조됩니다:
#ctx: 컨텍스트 객체.#vars:컨텍스트 변수.#locale: 컨텍스트 로케일.
따라서 우리는 다음과 같이 할 수 있습니다:
Established locale country: <span th:text="${#locale.country}">US</span>.이러한 객체의 전체 참조는 부록 A에서 읽을 수 있습니다.
표현식 유틸리티 객체
이러한 기본 객체 외에도 Thymeleaf는 표현식에서 일반적인 작업을 수행하는 데 도움이 되는 유틸리티 객체 세트를 제공합니다.
#execInfo: 처리 중인 템플릿에 대한 정보.#messages: #{…} 구문을 사용하여 얻을 수 있는 것과 동일한 방식으로 변수 표현식 내에서 외부화된 메시지를 얻기 위한 메서드.#uris: URL/URI의 일부를 이스케이프하기 위한 메서드#conversions: 구성된 변환 서비스 (있는 경우)를 실행하기 위한 메서드.#dates:java.util.Date객체를 위한 메서드: 포맷팅, 구성 요소 추출 등.#calendars:#dates와 유사하지만,java.util.Calendar객체를 위한 것.#temporals: JDK8+에서java.timeAPI를 사용하여 날짜와 시간을 다루기 위한 것.#numbers: 숫자 객체 포맷팅을 위한 메서드.#strings:String객체를 위한 메서드: contains, startsWith, prepending/appending 등.#objects: 일반적인 객체를 위한 메서드.#bools: 불리언 평가를 위한 메서드.#arrays: 배열을 위한 메서드.#lists: 리스트를 위한 메서드.#sets: 집합을 위한 메서드.#maps: 맵을 위한 메서드.#aggregates: 배열이나 컬렉션에 대한 집계를 생성하기 위한 메서드.#ids: 반복의 결과로 반복될 수 있는 id 속성을 다루기 위한 메서드.
이러한 유틸리티 객체가 제공하는 함수는 부록 B에서 확인할 수 있습니다.
홈페이지에서 날짜 재포맷하기
이제 우리는 이러한 유틸리티 객체에 대해 알게 되었으니, 홈페이지에서 날짜를 표시하는 방식을 변경하는 데 사용할 수 있습니다. HomeController에서 다음과 같이 하는 대신:
SimpleDateFormat dateFormat = new SimpleDateFormat("dd MMMM yyyy");
Calendar cal = Calendar.getInstance();

WebContext ctx = new WebContext(webExchange, webExchange.getLocale());
ctx.setVariable("today", dateFormat.format(cal.getTime()));

templateEngine.process("home", ctx, writer);
…우리는 다음과 같이 할 수 있습니다:
WebContext ctx = new WebContext(webExchange, webExchange.getLocale());
ctx.setVariable("today", Calendar.getInstance());

templateEngine.process("home", ctx, writer);
…그리고 뷰 레이어에서 날짜 포맷팅을 수행합니다:
<p>
  Today is:
  <span th:text="${#calendars.format(today,'dd MMMM yyyy')}">13 May 2011</span>
</p>
4.3 선택에 대한 표현식 (별표 구문)
변수 표현식은 ${...}뿐만 아니라 *{...}로도 작성할 수 있습니다.
하지만 중요한 차이점이 있습니다: 별표 구문은 전체 컨텍스트가 아닌 선택된 객체에 대해 표현식을 평가합니다. 즉, 선택된 객체가 없는 한 달러 구문과 별표 구문은 정확히 같은 일을 합니다.
그렇다면 선택된 객체란 무엇일까요? th:object 속성을 사용한 표현식의 결과입니다. 우리의 사용자 프로필(userprofile.html) 페이지에서 하나를 사용해 봅시다:
<div th:object="${session.user}">
  <p>Name: <span th:text="*{firstName}">Sebastian</span>.</p>
  <p>Surname: <span th:text="*{lastName}">Pepper</span>.</p>
  <p>Nationality: <span th:text="*{nationality}">Saturn</span>.</p>
</div>
이는 다음과 정확히 동일합니다:
<div>
  <p>Name: <span th:text="${session.user.firstName}">Sebastian</span>.</p>
  <p>Surname: <span th:text="${session.user.lastName}">Pepper</span>.</p>
  <p>Nationality: <span th:text="${session.user.nationality}">Saturn</span>.</p>
</div>
물론, 달러와 별표 구문을 혼합하여 사용할 수 있습니다:
<div th:object="${session.user}">
  <p>Name: <span th:text="*{firstName}">Sebastian</span>.</p>
  <p>Surname: <span th:text="${session.user.lastName}">Pepper</span>.</p>
  <p>Nationality: <span th:text="*{nationality}">Saturn</span>.</p>
</div>
객체 선택이 있을 때, 선택된 객체는 #object 표현식 변수로 달러 표현식에서도 사용할 수 있습니다:
<div th:object="${session.user}">
  <p>Name: <span th:text="${#object.firstName}">Sebastian</span>.</p>
  <p>Surname: <span th:text="${session.user.lastName}">Pepper</span>.</p>
  <p>Nationality: <span th:text="*{nationality}">Saturn</span>.</p>
</div>
앞서 말했듯이, 객체 선택이 수행되지 않았다면 달러와 별표 구문은 동일합니다.
<div>
  <p>Name: <span th:text="*{session.user.name}">Sebastian</span>.</p>
  <p>Surname: <span th:text="*{session.user.surname}">Pepper</span>.</p>
  <p>Nationality: <span th:text="*{session.user.nationality}">Saturn</span>.</p>
</div>
4.4 링크 URL
URL은 웹 애플리케이션 템플릿에서 중요성 때문에 일급 객체이며, Thymeleaf 표준 방언은 이를 위한 특별한 구문인 @ 구문을 가지고 있습니다: @{...}
URL에는 다양한 유형이 있습니다:
- 절대 URL:
http://www.thymeleaf.org - 상대 URL, 다음과 같은 것들이 있습니다:
- 페이지 상대:
user/login.html - 컨텍스트 상대:
/itemdetails?id=3(서버의 컨텍스트 이름이 자동으로 추가됩니다) - 서버 상대:
~/billing/processInvoice(같은 서버의 다른 컨텍스트(= 애플리케이션)의 URL을 호출할 수 있습니다) - 프로토콜 상대 URL:
//code.jquery.com/jquery-2.0.3.min.js
- 페이지 상대:
이러한 표현식의 실제 처리와 출력될 URL로의 변환은 사용 중인 ITemplateEngine 객체에 등록된 org.thymeleaf.linkbuilder.ILinkBuilder 인터페이스의 구현에 의해 수행됩니다.
기본적으로 이 인터페이스의 단일 구현이 org.thymeleaf.linkbuilder.StandardLinkBuilder 클래스로 등록되어 있으며, 이는 오프라인(비 웹) 및 Servlet API 기반의 웹 시나리오 모두에 충분합니다. 다른 시나리오(예: 비 ServletAPI 웹 프레임워크와의 통합)는 링크 빌더 인터페이스의 특정 구현이 필요할 수 있습니다.
이 새로운 구문을 사용해 봅시다. th:href 속성을 만나보세요:
<!-- 'http://localhost:8080/gtvg/order/details?orderId=3'를 생성합니다 (plus rewriting) -->
<a
  href="details.html"
  th:href="@{http://localhost:8080/gtvg/order/details(orderId=${o.id})}"
  >view</a
>

<!-- '/gtvg/order/details?orderId=3'를 생성합니다 (plus rewriting) -->
<a href="details.html" th:href="@{/order/details(orderId=${o.id})}">view</a>

<!-- '/gtvg/order/3/details'를 생성합니다 (plus rewriting) -->
<a href="details.html" th:href="@{/order/{orderId}/details(orderId=${o.id})}"
  >view</a
>
여기서 주목할 몇 가지 사항:
th:href는 수정자 속성입니다: 처리되면 링크 URL을 계산하여 그 값을<a>태그의href속성에 설정합니다.- URL 파라미터에 표현식을 사용할 수 있습니다(
orderId=${o.id}에서 볼 수 있듯이). 필요한 URL-파라미터-인코딩 작업도 자동으로 수행됩니다. - 여러 파라미터가 필요한 경우 쉼표로 구분합니다:
@{/order/process(execId=${execId},execType='FAST')} - URL 경로에서도 변수 템플릿이 허용됩니다:
@{/order/{orderId}/details(orderId=${orderId})} /로 시작하는 상대 URL(예:/order/details)은 자동으로 애플리케이션 컨텍스트 이름이 앞에 붙습니다.- 쿠키가 활성화되지 않았거나 아직 알 수 없는 경우, 세션을 유지하기 위해 상대 URL에
";jsessionid=..."접미사가 추가될 수 있습니다. 이를 URL 재작성이라고 하며, Thymeleaf는 모든 URL에 대해 Servlet API의response.encodeURL(...)메커니즘을 사용하여 자체 재작성 필터를 연결할 수 있게 합니다. th:href속성을 사용하면 템플릿에 (선택적으로) 작동하는 정적href속성을 가질 수 있어, 프로토타이핑 목적으로 브라우저에서 직접 열었을 때 템플릿 링크가 탐색 가능한 상태로 유지됩니다.
메시지 구문(#{...})과 마찬가지로, URL 기반도 다른 표현식의 평가 결과가 될 수 있습니다:
<a th:href="@{${url}(orderId=${o.id})}">view</a>
<a th:href="@{'/details/'+${user.login}(orderId=${o.id})}">view</a>
홈페이지를 위한 메뉴
이제 링크 URL을 생성하는 방법을 알았으니, 사이트의 다른 페이지들을 위한 작은 메뉴를 홈페이지에 추가하는 것은 어떨까요?
<p>Please select an option</p>
<ol>
  <li>
    <a href="product/list.html" th:href="@{/product/list}">Product List</a>
  </li>
  <li><a href="order/list.html" th:href="@{/order/list}">Order List</a></li>
  <li>
    <a href="subscribe.html" th:href="@{/subscribe}"
      >Subscribe to our Newsletter</a
    >
  </li>
  <li>
    <a href="userprofile.html" th:href="@{/userprofile}">See User Profile</a>
  </li>
</ol>
서버 루트 상대 URL
같은 서버의 다른 컨텍스트에 링크하기 위해 컨텍스트-루트 상대 URL 대신 서버-루트 상대 URL을 생성하는 데 사용할 수 있는 추가 구문이 있습니다. 이러한 URL은 @{~/path/to/something}과 같이 지정됩니다.
4.5 프래그먼트
프래그먼트 표현식은 마크업의 조각을 표현하고 템플릿 간에 이동시키는 쉬운 방법입니다. 이를 통해 프래그먼트를 복제하고, 다른 템플릿에 인수로 전달하는 등의 작업을 할 수 있습니다.
가장 일반적인 사용은 th:insert 또는 th:replace를 사용한 프래그먼트 삽입입니다(이에 대해서는 나중 섹션에서 자세히 설명합니다):
<div th:insert="~{commons :: main}">...</div>하지만 다른 변수와 마찬가지로 어디서든 사용할 수 있습니다:
<div th:with="frag=~{footer :: #main/text()}">
  <p th:insert="${frag}"></p>
</div>
이 튜토리얼의 뒷부분에는 템플릿 레이아웃에 대한 전체 섹션이 있으며, 프래그먼트 표현식에 대한 더 깊은 설명이 포함되어 있습니다.
4.6 리터럴
텍스트 리터럴
텍스트 리터럴은 단일 따옴표로 지정된 문자열입니다. 모든 문자를 포함할 수 있지만, 내부의 단일 따옴표는 \'를 사용하여 이스케이프해야 합니다.
<p>
  Now you are looking at a
  <span th:text="'working web application'">template file</span>.
</p>
숫자 리터럴
숫자 리터럴은 말 그대로 숫자입니다.
<p>The year is <span th:text="2013">1492</span>.</p>
<p>In two years, it will be <span th:text="2013 + 2">1494</span>.</p>
불리언 리터럴
불리언 리터럴은 true와 false입니다. 예를 들어:
<div th:if="${user.isAdmin()} == false">...</div>이 예에서 == false는 중괄호 밖에 작성되어 Thymeleaf가 처리합니다. 중괄호 안에 작성되었다면 OGNL/SpringEL 엔진의 책임이 됩니다:
<div th:if="${user.isAdmin() == false}">...</div>null 리터럴
null 리터럴도 사용할 수 있습니다:
<div th:if="${variable.something} == null">...</div>리터럴 토큰
숫자, 불리언, null 리터럴은 사실 리터럴 토큰의 특별한 경우입니다.
이 토큰들은 표준 표현식에서 약간의 단순화를 허용합니다. 텍스트 리터럴('...')과 정확히 같은 방식으로 작동하지만, 문자(A-Z와 a-z), 숫자(0-9), 대괄호([와 ]), 점(.), 하이픈(-), 밑줄(_)만 허용합니다. 따라서 공백, 쉼표 등은 사용할 수 없습니다.
좋은 점은? 토큰은 주변에 따옴표가 필요하지 않습니다. 따라서 다음과 같이 할 수 있습니다:
<div th:class="content">...</div>다음과 같이 하는 대신:
<div th:class="'content'">...</div>4.7 텍스트 추가
텍스트는 리터럴이든 변수나 메시지 표현식의 결과든 상관없이 + 연산자를 사용하여 쉽게 추가할 수 있습니다:
<span th:text="'The name of the user is ' + ${user.name}"></span>4.8 리터럴 대체
리터럴 대체를 사용하면 '...' + '...'로 리터럴을 추가할 필요 없이 변수의 값을 포함하는 문자열을 쉽게 포맷할 수 있습니다.
이러한 대체는 수직 막대(|)로 둘러싸야 합니다:
<span th:text="|Welcome to our application, ${user.name}!|"></span>이는 다음과 동일합니다
<span th:text="'Welcome to our application, ' + ${user.name} + '!'"></span>리터럴 대체는 다른 유형의 표현식과 결합할 수 있습니다:
<span th:text="${onevar} + ' ' + |${twovar}, ${threevar}|"></span>
|...|리터럴 대체 내부에는 변수/메시지 표현식(${...},*{...},#{...})만 허용됩니다. 다른 리터럴('...'), 불리언/숫자 토큰, 조건부 표현식 등은 허용되지 않습니다.
4.9 산술 연산
일부 산술 연산도 사용할 수 있습니다: +, -, *, /, %.
<div th:with="isEven=(${prodStat.count} % 2 == 0)"></div>이러한 연산자는 OGNL 변수 표현식 내부에서도 적용될 수 있습니다(이 경우 Thymeleaf 표준 표현식 엔진 대신 OGNL에 의해 실행됩니다):
<div th:with="isEven=${prodStat.count % 2 == 0}"></div>일부 연산자에 대한 텍스트 별칭이 존재합니다: div (/), mod (%).
4.10 비교 연산자와 동등성
표현식의 값은 >, <, >=, <= 기호로 비교할 수 있으며, ==와 != 연산자를 사용하여 동등성(또는 그 부재)을 확인할 수 있습니다. XML에서는 <와 > 기호를 속성 값에 사용해서는 안 되므로 <와 >로 대체해야 합니다.
<div th:if="${prodStat.count} > 1">
<span
th:text="'Execution mode is ' + ( (${execMode} == 'dev')? 'Development' : 'Production')"
></span>
</div>더 간단한 대안으로 일부 연산자에 대한 텍스트 별칭을 사용할 수 있습니다: gt (>), lt (<), ge (>=), le (<=), not (!). 또한 eq (==), neq/ne (!=).
4.11 조건부 표현식
조건부 표현식은 조건(자체가 다른 표현식임)의 평가 결과에 따라 두 표현식 중 하나만 평가하도록 되어 있습니다.
예제 조각을 살펴보겠습니다(다른 속성 수정자 th:class를 소개합니다):
<tr th:class="${row.even}? 'even' : 'odd'">
  ...
</tr>
조건부 표현식의 세 부분(condition, then, else) 모두 표현식이므로 변수(${...}, *{...}), 메시지(#{...}), URL(@{...}) 또는 리터럴('...')일 수 있습니다.
조건부 표현식은 괄호를 사용하여 중첩할 수도 있습니다:
<tr th:class="${row.even}? (${row.first}? 'first' : 'even') : 'odd'">
  ...
</tr>
else 표현식은 생략할 수도 있으며, 이 경우 조건이 거짓이면 null 값이 반환
<tr th:class="${row.even}? 'alt'">
  ...
</tr>
4.12 기본 표현식 (엘비스 연산자)
기본 표현식은 then 부분이 없는 특별한 종류의 조건부 값입니다. Groovy와 같은 일부 언어에 있는 Elvis 연산자와 동등하며, 두 개의 표현식을 지정할 수 있습니다: 첫 번째 표현식이 null이 아니면 사용되고, null이면 두 번째 표현식이 사용됩니다.
사용자 프로필 페이지에서 이를 실제로 사용해 보겠습니다:
<div th:object="${session.user}">
  ...
  <p>Age: <span th:text="*{age}?: '(no age specified)'">27</span>.</p>
</div>
보시다시피 연산자는 ?:이며, 여기서는 *{age} 평가 결과가 null인 경우에만 이름의 기본값(이 경우 리터럴 값)을 지정하는 데 사용합니다. 따라서 이는 다음과 동등합니다:
<p>
  Age: <span th:text="*{age != null}? *{age} : '(no age specified)'">27</span>.
</p>
조건부 값과 마찬가지로 괄호 사이에 중첩된 표현식을 포함할 수 있습니다:
<p>
  Name:
  <span th:text="*{firstName}?: (*{admin}? 'Admin' : #{default.username})"
    >Sebastian</span
  >
</p>
4.13 무연산 토큰
무연산 토큰은 밑줄 기호(_)로 표현됩니다.
이 토큰의 아이디어는 표현식에 대한 원하는 결과가 아무것도 하지 않는 것, 즉 처리 가능한 속성(예: th:text)이 전혀 없는 것과 정확히 같은 결과를 지정하는 것입니다.
다른 가능성 중에서도 이를 통해 개발자는 프로토타이핑 텍스트를 기본값으로 사용할 수 있습니다. 예를 들어, 다음 대신:
<span th:text="${user.name} ?: 'no user authenticated'">...</span>…우리는 ‘no user authenticated’를 프로토타이핑 텍스트로 직접 사용할 수 있으며, 이는 디자인 관점에서 더 간결하고 다재다능한 코드를 만듭니다:
<span th:text="${user.name} ?: _">no user authenticated</span>4.14 데이터 변환 / 포맷팅
Thymeleaf는 변수(${...})와 선택(*{...}) 표현식에 대해 이중 중괄호 구문을 정의하여 구성된 변환 서비스를 통해 데이터 변환을 적용할 수 있게 합니다.
기본적으로 다음과 같이 작동합니다:
<td th:text="${{user.lastAccessDate}}">...</td>여기서 이중 중괄호를 보셨나요?: ${{...}}. 이는 Thymeleaf에게 user.lastAccessDate 표현식의 결과를 변환 서비스에 전달하고 결과를 작성하기 전에 포맷팅 작업(String으로의 변환)을 수행하도록 요청합니다.
user.lastAccessDate가 java.util.Calendar 타입이라고 가정하면, 변환 서비스(IStandardConversionService의 구현)가 등록되어 있고 Calendar -> String에 대한 유효한 변환이 포함되어 있다면 적용될 것입니다.
IStandardConversionService의 기본 구현(StandardConversionService 클래스)은 단순히 String으로 변환되는 모든 객체에 대해 .toString()을 실행합니다. 사용자 정의 변환 서비스 구현을 등록하는 방법에 대한 자세한 정보는 구성에 대한 추가 정보 섹션을 참조하세요.
공식 thymeleaf-spring3 및 thymeleaf-spring4 통합 패키지는 Thymeleaf의 변환 서비스 메커니즘을 Spring의 Conversion Service 인프라와 투명하게 통합하므로, Spring 구성에서 선언된 변환 서비스와 포맷터가
${{...}}와*{{...}}표현식에 자동으로 사용 가능해집니다.
4.15 전처리
표현식 처리를 위한 이러한 모든 기능 외에도 Thymeleaf는 표현식을 전처리하는 기능을 가지고 있습니다.
전처리는 정상적인 실행 전에 수행되는 표현식의 실행으로, 최종적으로 실행될 표현식의 수정을 허용합니다.
전처리된 표현식은 정상적인 표현식과 정확히 같지만, 이중 밑줄 기호로 둘러싸여 있습니다(예: __${expression}__).
언어별 정적 메서드를 호출하는 OGNL 표현식을 포함하는 i18n Messages_fr.properties 항목이 있다고 상상해 봅시다:
[email protected]@translateToFrench({0})…그리고 Messages_es.properties 동일한 것:
[email protected]@translateToSpanish({0})로케일에 따라 하나의 표현식 또는 다른 표현식을 평가하는 마크업 조각을 만들 수 있습니다. 이를 위해 먼저 표현식을 선택(전처리를 통해)한 다음 Thymeleaf가 이를 실행하도록 할 것입니다:
<p th:text="${__#{article.text('textVar')}__}">Some text here...</p>프랑스어 로케일에 대한 전처리 단계는 다음과 같은 동등한 표현을 생성할 것입니다:
<p th:text="${@myapp.translator.Translator@translateToFrench(textVar)}">
  Some text here...
</p>
전처리 문자열 __는 속성에서 \_\_를 사용하여 이스케이프할 수 있습니다.
5 속성 값 설정
이 장에서는 마크업의 속성 값을 설정(또는 수정)하는 방법을 설명합니다.
5.1 모든 속성의 값 설정
우리 웹사이트가 뉴스레터를 발행하고, 사용자가 구독할 수 있게 하고 싶다고 가정해 봅시다. 그래서 /WEB-INF/templates/subscribe.html 템플릿에 폼을 만들었습니다:
<form action="subscribe.html">
  <fieldset>
    <input type="text" name="email" />
    <input type="submit" value="Subscribe!" />
  </fieldset>
</form>
Thymeleaf를 사용하면, 이 템플릿은 웹 애플리케이션을 위한 템플릿이라기보다는 정적 프로토타입에 가깝습니다. 첫째, 폼의 action 속성이 템플릿 파일 자체를 정적으로 링크하고 있어서 유용한 URL 재작성을 할 수 없습니다. 둘째, 제출 버튼의 value 속성이 영어로 텍스트를 표시하지만, 우리는 이를 국제화하고 싶습니다.
여기서 th:attr 속성이 등장하며, 이는 설정된 태그의 속성 값을 변경할 수 있습니다:
<form action="subscribe.html" th:attr="action=@{/subscribe}">
  <fieldset>
    <input type="text" name="email" />
    <input
      type="submit"
      value="Subscribe!"
      th:attr="value=#{subscribe.submit}"
    />
  </fieldset>
</form>
개념은 매우 간단합니다: th:attr는 단순히 속성에 값을 할당하는 표현식을 취합니다. 해당 컨트롤러와 메시지 파일을 생성한 후, 이 파일을 처리한 결과는 다음과 같을 것입니다:
<form action="/gtvg/subscribe">
  <fieldset>
    <input type="text" name="email" />
    <input type="submit" value="¡Suscríbe!" />
  </fieldset>
</form>
새로운 속성 값 외에도, 이전 장에서 설명한 대로 애플리케이션 컨텍스트 이름이 /gtvg/subscribe의 URL 베이스에 자동으로 접두사로 추가된 것을 볼 수 있습니다.
하지만 한 번에 두 개 이상의 속성을 설정하고 싶다면 어떨까요? XML 규칙은 태그에서 속성을 두 번 설정하는 것을 허용하지 않으므로, th:attr는 쉼표로 구분된 할당 목록을 사용합니다:
<img
  src="../../images/gtvglogo.png"
  th:attr="src=@{/images/gtvglogo.png},title=#{logo},alt=#{logo}"
/>
필요한 메시지 파일이 주어지면, 이는 다음과 같이 출력될 것입니다:
<img
  src="/gtgv/images/gtvglogo.png"
  title="Logo de Good Thymes"
  alt="Logo de Good Thymes"
/>
5.2 특정 속성의 값 설정
지금쯤이면 다음과 같은 것이:
<input type="submit" value="Subscribe!" th:attr="value=#{subscribe.submit}" />…꽤 못생긴 마크업이라고 생각하실 수 있습니다. 속성 값 내에 할당을 지정하는 것은 매우 실용적일 수 있지만, 항상 그렇게 해야 한다면 템플릿을 만드는 가장 우아한 방법은 아닙니다.
Thymeleaf도 여러분에게 동의하며, 그래서 th:attr는 템플릿에서 거의 사용되지 않습니다. 일반적으로 특정 태그 속성을 설정하는 다른 th:* 속성을 사용하게 될 것입니다(th:attr처럼 단순히 아무 속성이나 설정하는 것이 아닙니다).
예를 들어, value 속성을 설정하려면 th:value를 사용하세요:
<input type="submit" value="Subscribe!" th:value="#{subscribe.submit}" />이게 훨씬 더 좋아 보입니다! form 태그의 action 속성에도 같은 방식을 적용해 봅시다:
<form action="subscribe.html" th:action="@{/subscribe}"></form>그리고 우리가 이전에 home.html에 넣었던 th:href를 기억하시나요? 그것들도 정확히 이와 같은 종류의 속성입니다:
<li><a href="product/list.html" th:href="@{/product/list}">Product List</a></li>이와 같은 속성들이 상당히 많이 있으며, 각각은 특정 HTML5 속성을 대상으로 합니다:
th:abbr |
th:accept |
th:accept-charset |
th:accesskey |
th:action |
th:align |
th:alt |
th:archive |
th:audio |
th:autocomplete |
th:axis |
th:background |
th:bgcolor |
th:border |
th:cellpadding |
th:cellspacing |
th:challenge |
th:charset |
th:cite |
th:class |
th:classid |
th:codebase |
th:codetype |
th:cols |
th:colspan |
th:compact |
th:content |
th:contenteditable |
th:contextmenu |
th:data |
th:datetime |
th:dir |
th:draggable |
th:dropzone |
th:enctype |
th:for |
th:form |
th:formaction |
th:formenctype |
th:formmethod |
th:formtarget |
th:fragment |
th:frame |
th:frameborder |
th:headers |
th:height |
th:high |
th:href |
th:hreflang |
th:hspace |
th:http-equiv |
th:icon |
th:id |
th:inline |
th:keytype |
th:kind |
th:label |
th:lang |
th:list |
th:longdesc |
th:low |
th:manifest |
th:marginheight |
th:marginwidth |
th:max |
th:maxlength |
th:media |
th:method |
th:min |
th:name |
th:onabort |
th:onafterprint |
th:onbeforeprint |
th:onbeforeunload |
th:onblur |
th:oncanplay |
th:oncanplaythrough |
th:onchange |
th:onclick |
th:oncontextmenu |
th:ondblclick |
th:ondrag |
th:ondragend |
th:ondragenter |
th:ondragleave |
th:ondragover |
th:ondragstart |
th:ondrop |
th:ondurationchange |
th:onemptied |
th:onended |
th:onerror |
th:onfocus |
th:onformchange |
th:onforminput |
th:onhashchange |
th:oninput |
th:oninvalid |
th:onkeydown |
th:onkeypress |
th:onkeyup |
th:onload |
th:onloadeddata |
th:onloadedmetadata |
th:onloadstart |
th:onmessage |
th:onmousedown |
th:onmousemove |
th:onmouseout |
th:onmouseover |
th:onmouseup |
th:onmousewheel |
th:onoffline |
th:ononline |
th:onpause |
th:onplay |
th:onplaying |
th:onpopstate |
th:onprogress |
th:onratechange |
th:onreadystatechange |
th:onredo |
th:onreset |
th:onresize |
th:onscroll |
th:onseeked |
th:onseeking |
th:onselect |
th:onshow |
th:onstalled |
th:onstorage |
th:onsubmit |
th:onsuspend |
th:ontimeupdate |
th:onundo |
th:onunload |
th:onvolumechange |
th:onwaiting |
th:optimum |
th:pattern |
th:placeholder |
th:poster |
th:preload |
th:radiogroup |
th:rel |
th:rev |
th:rows |
th:rowspan |
th:rules |
th:sandbox |
th:scheme |
th:scope |
th:scrolling |
th:size |
th:sizes |
th:span |
th:spellcheck |
th:src |
th:srclang |
th:standby |
th:start |
th:step |
th:style |
th:summary |
th:tabindex |
th:target |
th:title |
th:type |
th:usemap |
th:value |
th:valuetype |
th:vspace |
th:width |
th:wrap |
th:xmlbase |
th:xmllang |
th:xmlspace |
5.3 한 번에 여러 값 설정
th:alt-title과 th:lang-xmllang이라는 두 가지 특별한 속성이 있는데, 이들은 동시에 두 개의 속성을 같은 값으로 설정하는 데 사용할 수 있습니다. 구체적으로:
th:alt-title은alt와title을 설정합니다.th:lang-xmllang은lang과xml:lang을 설정합니다.
GTVG 홈페이지에서 이를 사용하면 다음과 같은 코드를:
<img
  src="../../images/gtvglogo.png"
  th:attr="src=@{/images/gtvglogo.png},title=#{logo},alt=#{logo}"
/>
…또는 이와 동등한 다음 코드를:
<img
  src="../../images/gtvglogo.png"
  th:src="@{/images/gtvglogo.png}"
  th:title="#{logo}"
  th:alt="#{logo}"
/>
…다음과 같이 대체할 수 있습니다:
<img
  src="../../images/gtvglogo.png"
  th:src="@{/images/gtvglogo.png}"
  th:alt-title="#{logo}"
/>
5.4 추가 및 앞에 추가
Thymeleaf는 또한 th:attrappend와 th:attrprepend 속성을 제공하는데, 이들은 평가 결과를 기존 속성 값에 추가(접미사) 또는 앞에 추가(접두사)합니다.
예를 들어, 사용자의 이전 행동에 따라 사용할 특정 CSS 클래스가 달라질 수 있기 때문에, 버튼 중 하나에 추가할(설정이 아닌 단순 추가) CSS 클래스의 이름을 컨텍스트 변수에 저장하고 싶을 수 있습니다:
<input
  type="button"
  value="Do it!"
  class="btn"
  th:attrappend="class=${' ' + cssStyle}"
/>
이 템플릿을 cssStyle 변수를 “warning”으로 설정하여 처리하면 다음과 같은 결과를 얻습니다:
<input type="button" value="Do it!" class="btn warning" />표준 방언에는 또한 두 가지 특정 추가 속성이 있습니다: th:classappend와 th:styleappend 속성으로, 이들은 기존의 것들을 덮어쓰지 않고 CSS 클래스나 스타일 조각을 요소에 추가하는 데 사용됩니다:
<tr
  th:each="prod : ${prods}"
  class="row"
  th:classappend="${prodStat.odd}? 'odd'"
></tr>(th:each 속성에 대해 걱정하지 마세요. 이는 반복 속성이며 나중에 설명하겠습니다.)
5.5 고정 값 불리언 속성
HTML에는 불리언 속성의 개념이 있습니다. 이는 값이 없고 속성의 존재가 “true” 값을 의미하는 속성입니다. XHTML에서 이러한 속성은 단 하나의 값을 가지며, 그 값은 속성 자체입니다.
예를 들어, checked:
<input type="checkbox" name="option2" checked />
<!-- HTML -->
<input type="checkbox" name="option1" checked="checked" />
<!-- XHTML -->
표준 방언에는 조건을 평가하여 이러한 속성을 설정할 수 있는 속성들이 포함되어 있습니다. 평가 결과가 true이면 속성이 고정 값으로 설정되고, false이면 속성이 설정되지 않습니다:
<input type="checkbox" name="active" th:checked="${user.active}" />표준 방언에는 다음과 같은 고정 값 불리언 속성이 존재합니다:
th:async th:autofocus th:autoplay
th:checked th:controls th:declare
th:default th:defer th:disabled
th:formnovalidate th:hidden th:ismap
th:loop th:multiple th:novalidate
th:nowrap th:open th:pubdate
th:readonly th:required th:reversed
th:scoped th:seamless th:selected
5.6 모든 속성의 값 설정 (기본 속성 프로세서)
Thymeleaf는 기본 속성 프로세서를 제공하여 표준 방언에서 특정 th:* 프로세서가 정의되지 않은 경우에도 모든 속성의 값을 설정할 수 있게 합니다.
따라서 다음과 같은 코드는:
<span th:whatever="${user.name}">...</span>다음과 같은 결과를 낳습니다:
<span whatever="John Apricot">...</span>5.7 HTML5 친화적인 속성 및 요소 이름 지원
템플릿에 프로세서를 적용하기 위해 완전히 다른 구문을 사용하여 더 HTML5 친화적인 방식으로 작성할 수도 있습니다.
<table>
  <tr data-th-each="user : ${users}">
    <td data-th-text="${user.login}">...</td>
    <td data-th-text="${user.name}">...</td>
  </tr>
</table>
data-{prefix}-{name} 구문은 HTML5에서 사용자 정의 속성을 작성하는 표준 방식으로, 개발자가 th:*와 같은 네임스페이스가 있는 이름을 사용할 필요가 없습니다. Thymeleaf는 이 구문을 모든 방언(표준 방언뿐만 아니라)에서 자동으로 사용할 수 있게 합니다.
사용자 정의 태그를 지정하는 구문도 있습니다: {prefix}-{name}으로, 이는 W3C 사용자 정의 요소 명세(더 큰 W3C 웹 컴포넌트 명세의 일부)를 따릅니다. 이는 예를 들어 th:block 요소(또는 th-block)에 사용될 수 있으며, 이에 대해서는 나중 섹션에서 설명하겠습니다.
중요: 이 구문은 네임스페이스가 있는 th:* 구문에 추가된 것이며, 이를 대체하지 않습니다. 향후에 네임스페이스 구문을 폐기할 의도는 전혀 없습니다.
6 반복
지금까지 우리는 홈페이지, 사용자 프로필 페이지, 그리고 사용자가 뉴스레터를 구독할 수 있는 페이지를 만들었습니다… 하지만 우리의 제품은 어떻게 할까요? 이를 위해, 우리는 제품 페이지를 구축하기 위해 컬렉션의 항목을 반복하는 방법이 필요할 것입니다.
6.1 반복 기초
제품을 /WEB-INF/templates/product/list.html 페이지에 표시하기 위해 테이블을 사용할 것입니다. 각 제품은 <tr> 요소로 된 행에 표시되므로, 템플릿에는 각 제품을 어떻게 표시할지 예시하는 템플릿 행이 필요합니다. 그런 다음 Thymeleaf에게 각 제품마다 이를 반복하여 표시하도록 지시합니다.
표준 방언은 이를 위한 속성을 제공합니다: th:each.
th:each 사용
제품 목록 페이지를 위해, 우리는 서비스 계층에서 제품 목록을 가져와 템플릿 컨텍스트에 추가하는 컨트롤러 메서드가 필요합니다:
public void process(
        final IWebExchange webExchange,
        final ITemplateEngine templateEngine,
        final Writer writer)
        throws Exception {

    final ProductService productService = new ProductService();
    final List<Product> allProducts = productService.findAll();

    final WebContext ctx = new WebContext(webExchange, webExchange.getLocale());
    ctx.setVariable("prods", allProducts);

    templateEngine.process("product/list", ctx, writer);

}
그리고 나서 우리는 템플릿에서 th:each를 사용하여 제품 목록을 반복할 것입니다:
<!DOCTYPE html>

<html xmlns:th="http://www.thymeleaf.org">
  <head>
    <title>Good Thymes Virtual Grocery</title>
    <meta http-equiv="Content-Type" content="text/html; charset=UTF-8" />
    <link
      rel="stylesheet"
      type="text/css"
      media="all"
      href="../../../css/gtvg.css"
      th:href="@{/css/gtvg.css}"
    />
  </head>

  <body>
    <h1>Product list</h1>

    <table>
      <tr>
        <th>NAME</th>
        <th>PRICE</th>
        <th>IN STOCK</th>
      </tr>
      <tr th:each="prod : ${prods}">
        <td th:text="${prod.name}">Onions</td>
        <td th:text="${prod.price}">2.41</td>
        <td th:text="${prod.inStock}? #{true} : #{false}">yes</td>
      </tr>
    </table>

    <p>
      <a href="../home.html" th:href="@{/}">Return to home</a>
    </p>
  </body>
</html>
위에서 보이는 prod : ${prods} 속성 값은 “이 템플릿 조각을 ${prods}를 평가한 결과의 각 요소에 대해 반복하고, 현재 요소를 prod라는 변수에 사용하라”는 의미입니다. 각 부분에 이름을 붙여봅시다:
${prods}를 반복된 표현식(iterated expression) 또는 반복된 변수(iterated variable)라고 부르겠습니다.prod를 반복 변수(iteration variable) 또는 간단히 iter 변수(iter variable)라고 부르겠습니다.
prod iter 변수는 <tr> 요소에 범위가 지정되어 있어 <td>와 같은 내부 태그에서 사용할 수 있다는 점에 주목하세요.
반복 가능한 값
java.util.List 클래스만이 Thymeleaf에서 반복에 사용할 수 있는 유일한 값이 아닙니다. th:each 속성에서 반복 가능하다고 간주되는 객체들의 꽤 완전한 세트가 있습니다:
java.util.Iterable을 구현하는 모든 객체java.util.Enumeration을 구현하는 모든 객체java.util.Iterator를 구현하는 모든 객체, 그 값들은 모든 값을 메모리에 캐시할 필요 없이 반복자에 의해 반환되는 대로 사용됩니다.java.util.Map을 구현하는 모든 객체. 맵을 반복할 때, iter 변수는java.util.Map.Entry클래스가 됩니다.java.util.stream.Stream을 구현하는 모든 객체- 모든 배열
- 다른 모든 객체는 객체 자체를 포함하는 단일 값 리스트인 것처럼 처리됩니다.
6.2 반복 상태 유지
th:each를 사용할 때, Thymeleaf는 반복의 상태를 추적하는 데 유용한 메커니즘을 제공합니다: 상태 변수.
상태 변수는 th:each 속성 내에서 정의되며 다음 데이터를 포함합니다:
- 현재 반복 인덱스, 0부터 시작. 이는
index속성입니다. - 현재 반복 인덱스, 1부터 시작. 이는
count속성입니다. - 반복된 변수의 총 요소 수. 이는
size속성입니다. - 각 반복에 대한 iter 변수. 이는
current속성입니다. - 현재 반복이 짝수인지 홀수인지. 이들은
even/odd불리언 속성입니다. - 현재 반복이 첫 번째인지. 이는
first불리언 속성입니다. - 현재 반복이 마지막인지. 이는
last불리언 속성입니다.
이전 예제에서 어떻게 사용할 수 있는지 봅시다:
<table>
  <tr>
    <th>NAME</th>
    <th>PRICE</th>
    <th>IN STOCK</th>
  </tr>
  <tr th:each="prod,iterStat : ${prods}" th:class="${iterStat.odd}? 'odd'">
    <td th:text="${prod.name}">Onions</td>
    <td th:text="${prod.price}">2.41</td>
    <td th:text="${prod.inStock}? #{true} : #{false}">yes</td>
  </tr>
</table>
상태 변수(이 예제에서는 iterStat)는 th:each 속성에서 iter 변수 자체 뒤에 쉼표로 구분하여 이름을 작성함으로써 정의됩니다. iter 변수와 마찬가지로, 상태 변수도 th:each 속성을 가진 태그에 의해 정의된 코드 조각에 범위가 지정됩니다.
우리의 템플릿을 처리한 결과를 살펴봅시다:
<!DOCTYPE html>

<html>
  <head>
    <title>Good Thymes Virtual Grocery</title>
    <meta content="text/html; charset=UTF-8" http-equiv="Content-Type" />
    <link
      rel="stylesheet"
      type="text/css"
      media="all"
      href="/gtvg/css/gtvg.css"
    />
  </head>

  <body>
    <h1>Product list</h1>

    <table>
      <tr>
        <th>NAME</th>
        <th>PRICE</th>
        <th>IN STOCK</th>
      </tr>
      <tr class="odd">
        <td>Fresh Sweet Basil</td>
        <td>4.99</td>
        <td>yes</td>
      </tr>
      <tr>
        <td>Italian Tomato</td>
        <td>1.25</td>
        <td>no</td>
      </tr>
      <tr class="odd">
        <td>Yellow Bell Pepper</td>
        <td>2.50</td>
        <td>yes</td>
      </tr>
      <tr>
        <td>Old Cheddar</td>
        <td>18.75</td>
        <td>yes</td>
      </tr>
    </table>

    <p>
      <a href="/gtvg/" shape="rect">Return to home</a>
    </p>
  </body>
</html>
우리의 반복 상태 변수가 완벽하게 작동하여 홀수 행에만 odd CSS 클래스를 설정했음을 주목하세요.
상태 변수를 명시적으로 설정하지 않으면, Thymeleaf는 항상 반복 변수 이름에 Stat를 붙여 상태 변수를 만들어냅니다:
<table>
  <tr>
    <th>NAME</th>
    <th>PRICE</th>
    <th>IN STOCK</th>
  </tr>
  <tr th:each="prod : ${prods}" th:class="${prodStat.odd}? 'odd'">
    <td th:text="${prod.name}">Onions</td>
    <td th:text="${prod.price}">2.41</td>
    <td th:text="${prod.inStock}? #{true} : #{false}">yes</td>
  </tr>
</table>
6.3 데이터의 지연 검색을 통한 최적화
때때로 우리는 데이터 컬렉션의 검색(예: 데이터베이스에서)을 최적화하여 이러한 컬렉션이 실제로 사용될 때만 검색되도록 하고 싶을 수 있습니다.
실제로, 이는 모든 데이터에 적용될 수 있지만, 메모리 내 컬렉션의 크기를 고려할 때, 반복될 것으로 예상되는 컬렉션을 검색하는 것이 이 시나리오에서 가장 일반적인 경우입니다.
이를 지원하기 위해, Thymeleaf는 컨텍스트 변수를 지연 로드하는 메커니즘을 제공합니다. ILazyContextVariable 인터페이스를 구현하는 컨텍스트 변수(대부분 그 기본 구현인 LazyContextVariable을 확장함으로써)는 실행되는 순간에 해결될 것입니다. 예를 들어:
context.setVariable(
     "users",
     new LazyContextVariable<List<User>>() {
         @Override
         protected List<User> loadValue() {
             return databaseRepository.findAllUsers();
         }
     });
이 변수는 다음과 같은 코드에서 그 지연성에 대한 지식 없이 사용될 수 있습니다:
<ul>
  <li th:each="u : ${users}" th:text="${u.name}">user name</li>
</ul>
하지만 동시에, 다음과 같은 코드에서 condition이 false로 평가되면 절대 초기화되지 않을 것입니다(그 loadValue() 메서드는 절대 호출되지 않을 것입니다):
<ul th:if="${condition}">
  <li th:each="u : ${users}" th:text="${u.name}">user name</li>
</ul>
7 조건부 평가
7.1 단순 조건문: “if”와 “unless”
때로는 특정 조건이 충족될 때만 템플릿의 일부 조각이 결과에 나타나야 할 필요가 있습니다.
예를 들어, 제품 테이블에 각 제품에 대한 댓글 수를 보여주는 열을 추가하고, 댓글이 있는 경우 해당 제품의 댓글 상세 페이지로 연결되는 링크를 표시하고 싶다고 가정해 봅시다.
이를 위해 th:if 속성을 사용할 수 있습니다:
<table>
  <tr>
    <th>NAME</th>
    <th>PRICE</th>
    <th>IN STOCK</th>
    <th>COMMENTS</th>
  </tr>
  <tr th:each="prod : ${prods}" th:class="${prodStat.odd}? 'odd'">
    <td th:text="${prod.name}">Onions</td>
    <td th:text="${prod.price}">2.41</td>
    <td th:text="${prod.inStock}? #{true} : #{false}">yes</td>
    <td>
      <span th:text="${#lists.size(prod.comments)}">2</span> comment/s
      <a
        href="comments.html"
        th:href="@{/product/comments(prodId=${prod.id})}"
        th:if="${not #lists.isEmpty(prod.comments)}"
        >view</a
      >
    </td>
  </tr>
</table>
여기에는 많은 것들이 있지만, 중요한 줄에 집중해 봅시다:
<a
  href="comments.html"
  th:href="@{/product/comments(prodId=${prod.id})}"
  th:if="${not #lists.isEmpty(prod.comments)}"
  >view</a
>
이는 제품에 댓글이 있는 경우에만 댓글 페이지(URL /product/comments)로의 링크를 생성하며, prodId 매개변수를 제품의 id로 설정합니다.
결과 마크업을 살펴봅시다:
<table>
  <tr>
    <th>NAME</th>
    <th>PRICE</th>
    <th>IN STOCK</th>
    <th>COMMENTS</th>
  </tr>
  <tr>
    <td>Fresh Sweet Basil</td>
    <td>4.99</td>
    <td>yes</td>
    <td><span>0</span> comment/s</td>
  </tr>
  <tr class="odd">
    <td>Italian Tomato</td>
    <td>1.25</td>
    <td>no</td>
    <td>
      <span>2</span> comment/s
      <a href="/gtvg/product/comments?prodId=2">view</a>
    </td>
  </tr>
  <tr>
    <td>Yellow Bell Pepper</td>
    <td>2.50</td>
    <td>yes</td>
    <td><span>0</span> comment/s</td>
  </tr>
  <tr class="odd">
    <td>Old Cheddar</td>
    <td>18.75</td>
    <td>yes</td>
    <td>
      <span>1</span> comment/s
      <a href="/gtvg/product/comments?prodId=4">view</a>
    </td>
  </tr>
</table>
완벽합니다! 우리가 원하던 대로 되었습니다.
th:if 속성은 불리언 조건만 평가하는 것이 아닙니다. 그 기능은 조금 더 나아가서, 다음 규칙에 따라 지정된 표현식을 true로 평가합니다:
- 값이 null이 아닌 경우:
- 값이 불리언이고
true인 경우. - 값이 숫자이고 0이 아닌 경우
- 값이 문자이고 0이 아닌 경우
- 값이 문자열이고 “false”, “off” 또는 “no”가 아닌 경우
- 값이 불리언, 숫자, 문자 또는 문자열이 아닌 경우.
- 값이 불리언이고
- (값이 null인 경우, th:if는 false로 평가됩니다).
또한, th:if에는 반대 속성인 th:unless가 있어, OGNL 표현식 내에 not을 사용하는 대신 이전 예제에서 사용할 수 있었습니다:
<a
  href="comments.html"
  th:href="@{/comments(prodId=${prod.id})}"
  th:unless="${#lists.isEmpty(prod.comments)}"
  >view</a
>
7.2 switch 문
Java의 switch 구조와 동등한 방식으로 조건부로 내용을 표시하는 방법도 있습니다: th:switch / th:case 속성 세트입니다.
<div th:switch="${user.role}">
  <p th:case="'admin'">User is an administrator</p>
  <p th:case="#{roles.manager}">User is a manager</p>
</div>
한 th:case 속성이 true로 평가되면 동일한 switch 컨텍스트의 다른 모든 th:case 속성은 false로 평가된다는 점에 주목하세요.
기본 옵션은 th:case="*"로 지정됩니다:
<div th:switch="${user.role}">
  <p th:case="'admin'">User is an administrator</p>
  <p th:case="#{roles.manager}">User is a manager</p>
  <p th:case="*">User is some other thing</p>
</div>
8 템플릿 레이아웃
8.1 템플릿 프래그먼트 포함
프래그먼트 정의 및 참조
우리의 템플릿에서는 다른 템플릿의 일부분, 예를 들어 푸터, 헤더, 메뉴 등을 포함하고 싶을 때가 자주 있습니다.
이를 위해 Thymeleaf는 이러한 부분, “프래그먼트”를 포함을 위해 정의해야 하며, 이는 th:fragment 속성을 사용하여 수행할 수 있습니다.
예를 들어, 모든 식료품 페이지에 표준 저작권 푸터를 추가하고 싶다고 가정해 봅시다. 그래서 다음 코드를 포함하는 /WEB-INF/templates/footer.html 파일을 만듭니다:
<!DOCTYPE html>
<html xmlns:th="http://www.thymeleaf.org">
<body>
<div th:fragment="copy">© 2011 The Good Thymes Virtual Grocery</div>
</body>
</html>위의 코드는 copy라는 프래그먼트를 정의하며, 이를 th:insert 또는 th:replace 속성 중 하나를 사용하여 홈 페이지에 쉽게 포함할 수 있습니다:
<body>
  ...

  <div th:insert="~{footer :: copy}"></div>
</body>th:insert는 프래그먼트 표현식 (~{...})을 예상한다는 점에 주목하세요. 이는 프래그먼트를 결과로 하는 표현식입니다.
프래그먼트 명세 구문
프래그먼트 표현식의 구문은 꽤 간단합니다. 세 가지 다른 형식이 있습니다:
"~{templatename::selector}"templatename이라는 템플릿에 지정된 마크업 선택자를 적용하여 얻은 프래그먼트를 포함합니다.selector는 단순한 프래그먼트 이름일 수 있으므로, 위의~{footer :: copy}와 같이~{templatename::fragmentname}처럼 간단하게 지정할 수 있습니다.마크업 선택자 구문은 기본 AttoParser 파싱 라이브러리에 의해 정의되며, XPath 표현식이나 CSS 선택자와 유사합니다. 자세한 내용은 부록 C를 참조하세요.
"~{templatename}"templatename이라는 전체 템플릿을 포함합니다.th:insert/th:replace태그에서 사용하는 템플릿 이름은 현재 템플릿 엔진에서 사용 중인 템플릿 리졸버에 의해 해결 가능해야 합니다.~{::selector}"또는"~{this::selector}"동일한 템플릿에서selector와 일치하는 프래그먼트를 삽입합니다. 표현식이 나타나는 템플릿에서 찾을 수 없는 경우, 템플릿 호출(삽입) 스택이 원래 처리된 템플릿(루트)을 향해 순회되며, 어느 수준에서selector가 일치할 때까지 계속됩니다.
위의 예제에서 templatename과 selector는 다음과 같이 완전한 기능을 갖춘 표현식(조건문까지도!)일 수 있습니다:
<div
  th:insert="~{ footer :: (${user.isAdmin}? #{footer.admin} : #{footer.normaluser}) }"
></div>
프래그먼트는 모든 th:* 속성을 포함할 수 있습니다. 이러한 속성은 프래그먼트가 대상 템플릿(즉, th:insert/th:replace 속성이 있는 템플릿)에 포함될 때 한 번 평가되며, 이 대상 템플릿에 정의된 모든 컨텍스트 변수를 참조할 수 있습니다.
이 접근 방식의 큰 장점은 브라우저에서 완벽하게 표시할 수 있는 페이지에 프래그먼트를 작성할 수 있다는 것입니다. 완전하고 심지어 유효한 마크업 구조를 가지면서도, 여전히 Thymeleaf가 다른 템플릿에 포함할 수 있는 능력을 유지합니다.
th:fragment 없이 프래그먼트 참조하기
마크업 선택자의 강력함 덕분에, th:fragment 속성을 사용하지 않는 프래그먼트도 포함할 수 있습니다. 심지어 Thymeleaf를 전혀 모르는 다른 애플리케이션에서 온 마크업 코드일 수도 있습니다:
...
<div id="copy-section">© 2011 The Good Thymes Virtual Grocery</div>
...위의 프래그먼트를 CSS 선택자와 유사한 방식으로 id 속성을 참조하여 간단히 사용할 수 있습니다:
<body>
  ...

  <div th:insert="~{footer :: #copy-section}"></div>
</body>th:insert와 th:replace의 차이
그렇다면 th:insert와 th:replace의 차이점은 무엇일까요?
th:insert는 단순히 지정된 프래그먼트를 호스트 태그의 본문으로 삽입합니다.th:replace는 실제로 호스트 태그를 지정된 프래그먼트로 대체합니다.
따라서 다음과 같은 HTML 프래그먼트가 있다면:
<footer th:fragment="copy">© 2011 The Good Thymes Virtual Grocery</footer>…이를 호스트 <div> 태그에 두 번 포함하면 다음과 같습니다:
<body>
  ...

  <div th:insert="~{footer :: copy}"></div>

  <div th:replace="~{footer :: copy}"></div>
</body>
…결과는 다음과 같습니다:
<body>
...
<div>
<footer>© 2011 The Good Thymes Virtual Grocery</footer>
</div>
<footer>© 2011 The Good Thymes Virtual Grocery</footer>
</body>8.2 매개변수화 가능한 프래그먼트 시그니처(signature)
템플릿 프래그먼트에 대해 더 함수와 유사한 메커니즘을 만들기 위해, th:fragment로 정의된 프래그먼트는 매개변수 세트를 지정할 수 있습니다:
<div th:fragment="frag (onevar,twovar)">
  <p th:text="${onevar} + ' - ' + ${twovar}">...</p>
</div>
이는 th:insert 또는 th:replace에서 프래그먼트를 호출할 때 다음 두 가지 구문 중 하나를 사용해야 합니다:
<div th:replace="~{ ::frag (${value1},${value2}) }">...</div>
<div th:replace="~{ ::frag (onevar=${value1},twovar=${value2}) }">...</div>
마지막 옵션에서는 순서가 중요하지 않습니다:
<div th:replace="~{ ::frag (twovar=${value2},onevar=${value1}) }">...</div>프래그먼트 인수 없는 프래그먼트 로컬 변수
프래그먼트가 다음과 같이 인수 없이 정의되어 있더라도:
<div th:fragment="frag">...</div>위에서 지정한 두 번째 구문을 사용하여 호출할 수 있습니다(그리고 두 번째 구문만 사용할 수 있습니다):
<div th:replace="~{::frag (onevar=${value1},twovar=${value2})}"></div>이는 th:replace와 th:with의 조합과 동등합니다:
<div th:replace="~{::frag}" th:with="onevar=${value1},twovar=${value2}"></div>주의하세요. 인수 시그니처(signature)가 있든 없든, 프래그먼트에 대한 이러한 로컬 변수 지정은 실행 전에 컨텍스트를 비우지 않습니다. 프래그먼트는 여전히 현재 사용 중인 호출 템플릿의 모든 컨텍스트 변수에 접근할 수 있습니다.
템플릿 내 단언(assertion)을 위한 th:assert
th:assert 속성은 쉼표로 구분된 표현식 목록을 지정할 수 있으며, 이 표현식들은 평가되어 모든 평가에 대해 true를 생성해야 하며, 그렇지 않으면 예외가 발생합니다.
<div th:assert="${onevar},(${twovar} != 43)">...</div>이는 프래그먼트 시그니처(signature)에서 매개변수를 검증하는 데 유용합니다:
<header
  th:fragment="contentheader(title)"
  th:assert="${!#strings.isEmpty(title)}"
>
  ...
</header>
8.3 유연한 레이아웃: 단순한 프래그먼트 삽입을 넘어서
프래그먼트 표현식 덕분에, 텍스트, 숫자, 빈 객체가 아닌… 마크업 프래그먼트를 프래그먼트의 매개변수로 지정할 수 있습니다.
이를 통해 호출 템플릿에서 오는 마크업으로 풍부해질 수 있는 방식으로 프래그먼트를 만들 수 있어, 매우 유연한 템플릿 레이아웃 메커니즘이 가능해집니다.
아래 프래그먼트에서 title과 links 변수의 사용에 주목하세요:
<head th:fragment="common_header(title,links)">
  <title th:replace="${title}">The awesome application</title>

  <!-- 공통 스타일과 스크립트 -->
  <link
    rel="stylesheet"
    type="text/css"
    media="all"
    th:href="@{/css/awesomeapp.css}"
  />
  <link rel="shortcut icon" th:href="@{/images/favicon.ico}" />
  <script type="text/javascript" th:src="@{/sh/scripts/codebase.js}"></script>

  <!--/* 추가 링크를 위한 페이지별 플레이스홀더 */-->
  <th:block th:replace="${links}" />
</head>
이제 이 프래그먼트를 다음과 같이 호출할 수 있습니다:
...
<head th:replace="~{ base :: common_header(~{::title},~{::link}) }">
  <title>Awesome - Main</title>

  <link rel="stylesheet" th:href="@{/css/bootstrap.min.css}" />
  <link rel="stylesheet" th:href="@{/themes/smoothness/jquery-ui.css}" />
</head>
...
…그리고 결과는 호출 템플릿의 실제 <title>과 <link> 태그를 title과 links 변수의 값으로 사용하여 삽입 중에 우리의 프래그먼트를 사용자 정의할 것입니다:
...
<head>
  <title>Awesome - Main</title>

  <!-- 공통 스타일과 스크립트 -->
  <link
    rel="stylesheet"
    type="text/css"
    media="all"
    href="/awe/css/awesomeapp.css"
  />
  <link rel="shortcut icon" href="/awe/images/favicon.ico" />
  <script type="text/javascript" src="/awe/sh/scripts/codebase.js"></script>

  <link rel="stylesheet" href="/awe/css/bootstrap.min.css" />
  <link rel="stylesheet" href="/awe/themes/smoothness/jquery-ui.css" />
</head>
...
빈 프래그먼트 사용
특별한 프래그먼트 표현식인 빈 프래그먼트 (~{})를 사용하여 마크업 없음을 지정할 수 있습니다. 이전 예제를 사용하면:
<head th:replace="~{ base :: common_header(~{::title},~{}) }">
  <title>Awesome - Main</title>
</head>
...
프래그먼트의 두 번째 매개변수(links)가 빈 프래그먼트로 설정되어 있어 <th:block th:replace="${links}" /> 블록에 대해 아무것도 작성되지 않는다는 점에 주목하세요:
...
<head>
  <title>Awesome - Main</title>

  <!-- 공통 스타일과 스크립트 -->
  <link
    rel="stylesheet"
    type="text/css"
    media="all"
    href="/awe/css/awesomeapp.css"
  />
  <link rel="shortcut icon" href="/awe/images/favicon.ico" />
  <script type="text/javascript" src="/awe/sh/scripts/codebase.js"></script>
</head>
...
무연산 토큰 사용
프래그먼트에 현재 마크업을 기본값으로 사용하게 하고 싶다면 무연산도 프래그먼트의 매개변수로 사용할 수 있습니다. 다시 common_header 예제를 사용하면:
...
<head th:replace="~{base :: common_header(_,~{::link})}">
  <title>Awesome - Main</title>

  <link rel="stylesheet" th:href="@{/css/bootstrap.min.css}" />
  <link rel="stylesheet" th:href="@{/themes/smoothness/jquery-ui.css}" />
</head>
...
title 인수(즉, common_header 프래그먼트의 첫 번째 인수)가 무연산 (_)으로 설정되어 있어 프래그먼트의 이 부분이 전혀 실행되지 않는 것을 볼 수 있습니다(title = 무연산):
<title th:replace="${title}">The awesome application</title>따라서 결과는 다음과 같습니다:
...
<head>
  <title>The awesome application</title>

  <!-- 공통 스타일과 스크립트 -->
  <link
    rel="stylesheet"
    type="text/css"
    media="all"
    href="/awe/css/awesomeapp.css"
  />
  <link rel="shortcut icon" href="/awe/images/favicon.ico" />
  <script type="text/javascript" src="/awe/sh/scripts/codebase.js"></script>

  <link rel="stylesheet" href="/awe/css/bootstrap.min.css" />
  <link rel="stylesheet" href="/awe/themes/smoothness/jquery-ui.css" />
</head>
...
프래그먼트의 고급 조건부 삽입
빈 프래그먼트와 무연산 토큰 모두를 사용할 수 있어 매우 쉽고 우아한 방식으로 프래그먼트의 조건부 삽입을 수행할 수 있습니다.
예를 들어, 사용자가 관리자인 경우에만 common :: adminhead 프래그먼트를 삽입하고, 그렇지 않으면 아무것도 삽입하지 않기 위해 다음과 같이 할 수 있습니다:
...
<div th:insert="${user.isAdmin()} ? ~{common :: adminhead} : ~{}">...</div>
...
또한 무연산 토큰을 사용하여 지정된 조건이 충족되는 경우에만 프래그먼트를 삽입하고, 조건이 충족되지 않으면 마크업을 수정하지 않고 그대로 둘 수 있습니다:
...
<div th:insert="${user.isAdmin()} ? ~{common :: adminhead} : _">
  Welcome [[${user.name}]], click <a th:href="@{/support}">here</a> for
  help-desk support.
</div>
...
추가적으로, 템플릿 리졸버를 템플릿 리소스의 존재 여부를 확인하도록 구성했다면 checkExistence 플래그를 통해 프래그먼트 자체의 존재 여부를 기본 연산의 조건으로 사용할 수 있습니다:
...
<!-- "common :: salutation" 프래그먼트가 존재하지 않는 경우(또는 비어 있는 경우) -->
<!-- <div>의 본문이 사용됩니다.                                                -->
<div th:insert="~{common :: salutation} ?: _">
  Welcome [[${user.name}]], click <a th:href="@{/support}">here</a> for
  help-desk support.
</div>
...
8.4 템플릿 프래그먼트 제거
예제 애플리케이션으로 돌아가서, 제품 목록 템플릿의 마지막 버전을 다시 살펴봅시다:
<table>
  <tr>
    <th>NAME</th>
    <th>PRICE</th>
    <th>IN STOCK</th>
    <th>COMMENTS</th>
  </tr>
  <tr th:each="prod : ${prods}" th:class="${prodStat.odd}? 'odd'">
    <td th:text="${prod.name}">Onions</td>
    <td th:text="${prod.price}">2.41</td>
    <td th:text="${prod.inStock}? #{true} : #{false}">yes</td>
    <td>
      <span th:text="${#lists.size(prod.comments)}">2</span> comment/s
      <a
        href="comments.html"
        th:href="@{/product/comments(prodId=${prod.id})}"
        th:unless="${#lists.isEmpty(prod.comments)}"
        >view</a
      >
    </td>
  </tr>
</table>
이 코드는 템플릿으로는 괜찮지만, 정적 페이지로는(Thymeleaf 처리 없이 브라우저에서 직접 열 때) 좋은 프로토타입이 되지 않습니다.
왜일까요? 브라우저에서 완벽하게 표시될 수 있지만, 그 테이블은 단 하나의 행만 가지고 있고, 이 행은 모의 데이터를 포함하고 있습니다. 프로토타입으로서는 충분히 현실적으로 보이지 않습니다… 하나 이상의 제품이 있어야 합니다, 더 많은 행이 필요합니다.
그래서 몇 개 더 추가해 봅시다:
<table>
  <tr>
    <th>NAME</th>
    <th>PRICE</th>
    <th>IN STOCK</th>
    <th>COMMENTS</th>
  </tr>
  <tr th:each="prod : ${prods}" th:class="${prodStat.odd}? 'odd'">
    <td th:text="${prod.name}">Onions</td>
    <td th:text="${prod.price}">2.41</td>
    <td th:text="${prod.inStock}? #{true} : #{false}">yes</td>
    <td>
      <span th:text="${#lists.size(prod.comments)}">2</span> comment/s
      <a
        href="comments.html"
        th:href="@{/product/comments(prodId=${prod.id})}"
        th:unless="${#lists.isEmpty(prod.comments)}"
        >view</a
      >
    </td>
  </tr>
  <tr class="odd">
    <td>Blue Lettuce</td>
    <td>9.55</td>
    <td>no</td>
    <td><span>0</span> comment/s</td>
  </tr>
  <tr>
    <td>Mild Cinnamon</td>
    <td>1.99</td>
    <td>yes</td>
    <td>
      <span>3</span> comment/s
      <a href="comments.html">view</a>
    </td>
  </tr>
</table>
좋습니다, 이제 세 개가 있어 프로토타입으로는 확실히 더 좋습니다. 하지만… Thymeleaf로 처리하면 어떻게 될까요?:
<table>
  <tr>
    <th>NAME</th>
    <th>PRICE</th>
    <th>IN STOCK</th>
    <th>COMMENTS</th>
  </tr>
  <tr>
    <td>Fresh Sweet Basil</td>
    <td>4.99</td>
    <td>yes</td>
    <td><span>0</span> comment/s</td>
  </tr>
  <tr class="odd">
    <td>Italian Tomato</td>
    <td>1.25</td>
    <td>no</td>
    <td>
      <span>2</span> comment/s
      <a href="/gtvg/product/comments?prodId=2">view</a>
    </td>
  </tr>
  <tr>
    <td>Yellow Bell Pepper</td>
    <td>2.50</td>
    <td>yes</td>
    <td><span>0</span> comment/s</td>
  </tr>
  <tr class="odd">
    <td>Old Cheddar</td>
    <td>18.75</td>
    <td>yes</td>
    <td>
      <span>1</span> comment/s
      <a href="/gtvg/product/comments?prodId=4">view</a>
    </td>
  </tr>
  <tr class="odd">
    <td>Blue Lettuce</td>
    <td>9.55</td>
    <td>no</td>
    <td><span>0</span> comment/s</td>
  </tr>
  <tr>
    <td>Mild Cinnamon</td>
    <td>1.99</td>
    <td>yes</td>
    <td>
      <span>3</span> comment/s
      <a href="comments.html">view</a>
    </td>
  </tr>
</table>
마지막 두 행은 모의 행입니다! 물론 그렇습니다: 반복은 첫 번째 행에만 적용되었으므로, Thymeleaf가 다른 두 행을 제거해야 할 이유가 없습니다.
템플릿 처리 중에 이 두 행을 제거할 방법이 필요합니다. 두 번째와 세 번째 <tr> 태그에 th:remove 속성을 사용해 봅시다:
<table>
  <tr>
    <th>NAME</th>
    <th>PRICE</th>
    <th>IN STOCK</th>
    <th>COMMENTS</th>
  </tr>
  <tr th:each="prod : ${prods}" th:class="${prodStat.odd}? 'odd'">
    <td th:text="${prod.name}">Onions</td>
    <td th:text="${prod.price}">2.41</td>
    <td th:text="${prod.inStock}? #{true} : #{false}">yes</td>
    <td>
      <span th:text="${#lists.size(prod.comments)}">2</span> comment/s
      <a
        href="comments.html"
        th:href="@{/product/comments(prodId=${prod.id})}"
        th:unless="${#lists.isEmpty(prod.comments)}"
        >view</a
      >
    </td>
  </tr>
  <tr class="odd" th:remove="all">
    <td>Blue Lettuce</td>
    <td>9.55</td>
    <td>no</td>
    <td><span>0</span> comment/s</td>
  </tr>
  <tr th:remove="all">
    <td>Mild Cinnamon</td>
    <td>1.99</td>
    <td>yes</td>
    <td>
      <span>3</span> comment/s
      <a href="comments.html">view</a>
    </td>
  </tr>
</table>
처리가 완료되면 모든 것이 다시 원래대로 보일 것입니다:
<table>
  <tr>
    <th>NAME</th>
    <th>PRICE</th>
    <th>IN STOCK</th>
    <th>COMMENTS</th>
  </tr>
  <tr>
    <td>Fresh Sweet Basil</td>
    <td>4.99</td>
    <td>yes</td>
    <td><span>0</span> comment/s</td>
  </tr>
  <tr class="odd">
    <td>Italian Tomato</td>
    <td>1.25</td>
    <td>no</td>
    <td>
      <span>2</span> comment/s
      <a href="/gtvg/product/comments?prodId=2">view</a>
    </td>
  </tr>
  <tr>
    <td>Yellow Bell Pepper</td>
    <td>2.50</td>
    <td>yes</td>
    <td><span>0</span> comment/s</td>
  </tr>
  <tr class="odd">
    <td>Old Cheddar</td>
    <td>18.75</td>
    <td>yes</td>
    <td>
      <span>1</span> comment/s
      <a href="/gtvg/product/comments?prodId=4">view</a>
    </td>
  </tr>
</table>
그리고 속성의 all 값은 무엇을 의미할까요? th:remove는 그 값에 따라 다섯 가지 다른 방식으로 동작할 수 있습니다:
all: 포함하는 태그와 그 모든 자식을 제거합니다.body: 포함하는 태그는 제거하지 않지만, 그 모든 자식을 제거합니다.tag: 포함하는 태그는 제거하지만, 그 자식은 제거하지 않습니다.all-but-first: 포함하는 태그의 첫 번째 자식을 제외한 모든 자식을 제거합니다.none: 아무 것도 하지않습니다. 이 값은 동적 평가에 유용합니다.
all-but-first 값은 어디에 유용할까요? 프로토타이핑 시 일부 th:remove="all"을 절약할 수 있게 해줍니다:
<table>
  <thead>
    <tr>
      <th>NAME</th>
      <th>PRICE</th>
      <th>IN STOCK</th>
      <th>COMMENTS</th>
    </tr>
  </thead>
  <tbody th:remove="all-but-first">
    <tr th:each="prod : ${prods}" th:class="${prodStat.odd}? 'odd'">
      <td th:text="${prod.name}">Onions</td>
      <td th:text="${prod.price}">2.41</td>
      <td th:text="${prod.inStock}? #{true} : #{false}">yes</td>
      <td>
        <span th:text="${#lists.size(prod.comments)}">2</span> comment/s
        <a
          href="comments.html"
          th:href="@{/product/comments(prodId=${prod.id})}"
          th:unless="${#lists.isEmpty(prod.comments)}"
          >view</a
        >
      </td>
    </tr>
    <tr class="odd">
      <td>Blue Lettuce</td>
      <td>9.55</td>
      <td>no</td>
      <td><span>0</span> comment/s</td>
    </tr>
    <tr>
      <td>Mild Cinnamon</td>
      <td>1.99</td>
      <td>yes</td>
      <td>
        <span>3</span> comment/s
        <a href="comments.html">view</a>
      </td>
    </tr>
  </tbody>
</table>
th:remove 속성은 허용된 문자열 값(all, tag, body, all-but-first 또는 none) 중 하나를 반환하는 한 Thymeleaf 표준 표현식을 사용할 수 있습니다.
이는 제거가 조건부일 수 있음을 의미합니다. 예를 들어:
<a href="/something" th:remove="${condition}? tag : none"
  >Link text not to be removed</a
>
또한 th:remove는 null을 none의 동의어로 간주하므로, 위의 예제와 동일하게 작동합니다:
<a href="/something" th:remove="${condition}? tag"
  >Link text not to be removed</a
>
이 경우, ${condition}이 false이면 null이 반환되어 제거가 수행되지 않습니다.
8.5 레이아웃 상속
단일 파일을 레이아웃으로 사용하기 위해 프래그먼트를 사용할 수 있습니다. th:fragment와 th:replace를 사용하여 title과 content를 가진 간단한 레이아웃의 예:
<!DOCTYPE html>
<html th:fragment="layout (title, content)" xmlns:th="http://www.thymeleaf.org">
  <head>
    <title th:replace="${title}">Layout Title</title>
  </head>
  <body>
    <h1>Layout H1</h1>
    <div th:replace="${content}">
      <p>Layout content</p>
    </div>
    <footer>Layout footer</footer>
  </body>
</html>
이 예제는 매개변수로 title과 content를 가진 layout이라는 프래그먼트를 선언합니다. 둘 다 아래 예제에서 제공된 프래그먼트 표현식에 의해 상속하는 페이지에서 대체될 것입니다.
<!DOCTYPE html>
<html th:replace="~{layoutFile :: layout(~{::title}, ~{::section})}">
  <head>
    <title>Page Title</title>
  </head>
  <body>
    <section>
      <p>Page content</p>
      <div>Included on page</div>
    </section>
  </body>
</html>
이 파일에서 html 태그는 layout으로 대체되지만, 레이아웃에서 title과 content는 각각 title과 section 블록으로 대체됩니다.
원하는 경우, 레이아웃은 header와 footer와 같은 여러 프래그먼트로 구성될 수 있습니다.
9 로컬 변수
Thymeleaf는 템플릿의 특정 프래그먼트에 대해 정의되고 해당 프래그먼트 내에서만 평가에 사용할 수 있는 변수를 로컬 변수라고 부릅니다.
우리가 이미 본 예시는 제품 목록 페이지의 prod 반복 변수입니다:
<tr th:each="prod : ${prods}">
  ...
</tr>
이 prod 변수는 <tr> 태그의 범위 내에서만 사용할 수 있습니다. 구체적으로:
th:each보다 우선순위가 낮은 (즉,th:each이후에 실행되는) 해당 태그의 다른th:*속성에서 사용할 수 있습니다.<td>요소와 같은<tr>태그의 모든 자식 요소에서 사용할 수 있습니다.
Thymeleaf는 th:with 속성을 사용하여 반복 없이 로컬 변수를 선언하는 방법을 제공하며, 그 구문은 속성 값 할당과 유사합니다:
<div th:with="firstPer=${persons[0]}">
  <p>
    The name of the first person is
    <span th:text="${firstPer.name}">Julius Caesar</span>.
  </p>
</div>th:with가 처리될 때, firstPer 변수는 로컬 변수로 생성되어 컨텍스트에서 온 변수 맵에 추가됩니다. 따라서 컨텍스트에 선언된 다른 변수들과 함께 평가에 사용할 수 있지만, 포함하는 <div> 태그의 범위 내에서만 사용할 수 있습니다.
일반적인 다중 할당 구문을 사용하여 한 번에 여러 변수를 정의할 수 있습니다:
<div th:with="firstPer=${persons[0]},secondPer=${persons[1]}">
  <p>
    The name of the first person is
    <span th:text="${firstPer.name}">Julius Caesar</span>.
  </p>
  <p>
    But the name of the second person is
    <span th:text="${secondPer.name}">Marcus Antonius</span>.
  </p>
</div>
th:with 속성은 동일한 속성에서 정의된 변수를 재사용할 수 있습니다:
<div th:with="company=${user.company + ' Co.'},account=${accounts[company]}">
  ...
</div>
이를 우리의 Grocery 홈페이지에서 사용해 봅시다! 형식화된 날짜를 출력하기 위해 작성한 코드를 기억하시나요?
<p>
  Today is:
  <span th:text="${#calendars.format(today,'dd MMMM yyyy')}"
    >13 february 2011</span
  >
</p>
그런데 만약 "dd MMMM yyyy"가 실제로 로케일에 따라 달라지기를 원한다면 어떨까요? 예를 들어, home_en.properties에 다음과 같은 메시지를 추가하고 싶을 수 있습니다:
date.format=MMMM dd'','' yyyy…그리고 home_es.properties에 이와 동등한 것을 추가할 수 있습니다:
date.format=dd ''de'' MMMM'','' yyyy이제 th:with를 사용하여 지역화된 날짜 형식을 변수로 가져와서 th:text 표현식에서 사용해 봅시다:
<p th:with="df=#{date.format}">
  Today is:
  <span th:text="${#calendars.format(today,df)}">13 February 2011</span>
</p>
깔끔하고 쉽습니다. 사실, th:with가 th:text보다 높은 우선순위를 가지고 있다는 점을 고려하면, 이 모든 것을 span 태그에서 해결할 수 있었습니다:
<p>
  Today is:
  <span th:with="df=#{date.format}" th:text="${#calendars.format(today,df)}">
    13 February 2011
  </span>
</p>
“우선순위? 우리는 아직 그것에 대해 이야기하지 않았는데!”라고 생각하실 수 있습니다. 걱정하지 마세요. 다음 장에서 바로 그것에 대해 다룰 것입니다.
10 속성 우선순위
같은 태그에 여러 개의 th:* 속성을 작성하면 어떻게 될까요? 예를 들어:
<ul>
  <li th:each="item : ${items}" th:text="${item.description}">
    Item description here...
  </li>
</ul>
우리가 원하는 결과를 얻으려면 th:each 속성이 th:text 전에 실행되어야 한다고 예상할 것입니다. 하지만 HTML/XML 표준은 태그의 속성이 작성되는 순서에 어떤 의미도 부여하지 않기 때문에, 예상대로 작동하도록 하기 위해 속성 자체에 우선순위 메커니즘이 설정되어야 했습니다.
따라서 모든 Thymeleaf 속성은 태그 내에서 실행되는 순서를 설정하는 숫자 우선순위를 정의합니다. 이 순서는 다음과 같습니다:
| 순서 | 기능 | 속성 |
|---|---|---|
| 1 | 프래그먼트 포함 | th:insertth:replace |
| 2 | 프래그먼트 반복 | th:each |
| 3 | 조건부 평가 | th:ifth:unlessth:switchth:case |
| 4 | 로컬 변수 정의 | th:objectth:with |
| 5 | 일반 속성 수정 | th:attrth:attrprependth:attrappend |
| 6 | 특정 속성 수정 | th:valueth:hrefth:src... |
| 7 | 텍스트 (태그 본문 수정) | th:textth:utext |
| 8 | 프래그먼트 지정 | th:fragment |
| 9 | 프래그먼트 제거 | th:remove |
이 우선순위 메커니즘은 위의 반복 프래그먼트가 속성 위치가 바뀌어도 정확히 동일한 결과를 제공한다는 것을 의미합니다(약간 덜 읽기 쉽긴 하지만):
<ul>
  <li th:text="${item.description}" th:each="item : ${items}">
    Item description here...
  </li>
</ul>
11 주석과 블록
11.1. 표준 HTML/XML 주석
표준 HTML/XML 주석 <!-- ... -->은 Thymeleaf 템플릿 어디에서나 사용할 수 있습니다. 이러한 주석 내부의 모든 내용은 Thymeleaf에 의해 처리되지 않고, 결과에 그대로 복사됩니다:
<!-- 사용자 정보가 따라옵니다 -->
<div th:text="${...}">...</div>
11.2. Thymeleaf 파서 레벨 주석 블록
파서 레벨 주석 블록은 Thymeleaf가 템플릿을 파싱할 때 단순히 제거될 코드입니다. 이는 다음과 같이 보입니다:
<!--/* 이 코드는 Thymeleaf 파싱 시 제거될 것입니다! */-->Thymeleaf는 <!--/*와 */--> 사이의 모든 것을 제거할 것이므로, 이러한 주석 블록은 템플릿이 정적으로 열려 있을 때 코드를 표시하는 데 사용될 수 있으며, Thymeleaf가 처리할 때 제거될 것임을 알 수 있습니다:
<!--/*-->
<div>you can see me only before Thymeleaf processes me!</div>
<!--*/-->
이는 예를 들어 많은 <tr>이 있는 테이블을 프로토타이핑할 때 매우 유용할 수 있습니다:
<table>
  <tr th:each="x : ${xs}">
    ...
  </tr>
  <!--/*-->
  <tr>
    ...
  </tr>
  <tr>
    ...
  </tr>
  <!--*/-->
</table>
11.3. Thymeleaf 프로토타입 전용 주석 블록
Thymeleaf는 템플릿이 정적으로 열려 있을 때(즉, 프로토타입으로) 주석으로 표시되지만, 템플릿을 실행할 때 Thymeleaf에 의해 정상적인 마크업으로 간주되는 특별한 주석 블록의 정의를 허용합니다.
<span>hello!</span>
<!--/*/
  <div th:text="${...}">
    ...
  </div>
/*/-->
<span>goodbye!</span>
Thymeleaf의 파싱 시스템은 단순히 <!--/*/와 /*/--> 마커를 제거하지만, 그 내용은 제거하지 않아 주석 처리되지 않은 상태로 남게 됩니다. 따라서 템플릿을 실행할 때, Thymeleaf는 실제로 다음과 같이 볼 것입니다:
<span>hello!</span>

<div th:text="${...}">...</div>

<span>goodbye!</span>
파서 레벨 주석 블록과 마찬가지로, 이 기능은 방언에 독립적입니다.
11.4. 가상적인 th:block 태그
표준 방언에 포함된 Thymeleaf의 유일한 요소 프로세서(속성이 아님)는 th:block입니다.
th:block은 템플릿 개발자가 원하는 속성을 지정할 수 있게 해주는 단순한 속성 컨테이너입니다. Thymeleaf는 이러한 속성을 실행한 다음 단순히 블록을 사라지게 하지만, 그 내용은 사라지지 않습니다.
따라서 예를 들어, 각 요소에 대해 하나 이상의 <tr>이 필요한 반복 테이블을 만들 때 유용할 수 있습니다:
<table>
  <th:block th:each="user : ${users}">
    <tr>
      <td th:text="${user.login}">...</td>
      <td th:text="${user.name}">...</td>
    </tr>
    <tr>
      <td colspan="2" th:text="${user.address}">...</td>
    </tr>
  </th:block>
</table>
그리고 프로토타입 전용 주석 블록과 함께 사용할 때 특히 유용합니다:
<table>
  <!--/*/ <th:block th:each="user : ${users}"> /*/-->
  <tr>
    <td th:text="${user.login}">...</td>
    <td th:text="${user.name}">...</td>
  </tr>
  <tr>
    <td colspan="2" th:text="${user.address}">...</td>
  </tr>
  <!--/*/ </th:block> /*/-->
</table>
이 솔루션이 템플릿을 유효한 HTML로 만들고(즉, <table> 안에 금지된 <div> 블록을 추가할 필요가 없음), 프로토타입으로 브라우저에서 정적으로 열었을 때도 정상적으로 작동한다는 점에 주목하세요!
12 인라인
12.1 표현식 인라인
Although the Standard Dialect allows us to do almost everything using tag attributes, there are situations in which we could prefer writing expressions directly into our HTML texts. For example, we could prefer writing this:
<p>Hello, [[${session.user.name}]]!</p>…instead of this:
<p>Hello, <span th:text="${session.user.name}">Sebastian</span>!</p>Expressions between [[...]] or [(...)] are considered inlined expressions in Thymeleaf, and inside them we can use any kind of expression that would also be valid in a th:text or th:utext attribute.
Note that, while [[...]] corresponds to th:text (i.e. result will be HTML-escaped), [(...)] corresponds to th:utext and will not perform any HTML-escaping. So with a variable such as msg = 'This is <b>great!</b>', given this fragment:
<p>The message is "[(${msg})]"</p>The result will have those <b> tags unescaped, so:
<p>The message is "This is <b>great!</b>"</p>Whereas if escaped like:
<p>The message is "[[${msg}]]"</p>The result will be HTML-escaped:
<p>The message is "This is <b>great!</b>"</p>Note that text inlining is active by default in the body of every tag in our markup –- not the tags themselves -–, so there is nothing we need to do to enable it.
인라인 vs 자연 템플릿
If you come from other template engines in which this way of outputting text is the norm, you might be asking: Why aren’t we doing this from the beginning? It’s less code than all those th:text attributes!
Well, be careful there, because although you might find inlining quite interesting, you should always remember that inlined expressions will be displayed verbatim in your HTML files when you open them statically, so you probably won’t be able to use them as design prototypes anymore!
The difference between how a browser would statically display our fragment of code without using inlining…
Hello, Sebastian!…and using it…
Hello, [[${session.user.name}]]!…is quite clear in terms of design usefulness.
인라인 비활성화
This mechanism can be disabled though, because there might actually be occasions in which we do want to output the [[...]] or [(...)] sequences without its contents being processed as an expression. For that, we will use th:inline="none":
<p th:inline="none">A double array looks like this: [[1, 2, 3], [4, 5]]!</p>This will result in:
<p>A double array looks like this: [[1, 2, 3], [4, 5]]!</p>12.2 텍스트 인라인
Text inlining is very similar to the expression inlining capability we have just seen, but it actually adds more power. It has to be enabled explicitly with th:inline="text".
Text inlining not only allows us to use the same inlined expressions we just saw, but in fact processes tag bodies as if they were templates processed in the TEXT template mode, which allows us to perform text-based template logic (not only output expressions).
We will see more about this in the next chapter about the textual template modes.
12.3 JavaScript 인라인
JavaScript inlining allows for a better integration of JavaScript <script> blocks in templates being processed in the HTML template mode.
As with text inlining, this is actually equivalent to processing the scripts contents as if they were templates in the JAVASCRIPT template mode, and therefore all the power of the textual template modes (see next chapter) will be at hand. However, in this section we will focus on how we can use it for adding the output of our Thymeleaf expressions into our JavaScript blocks.
This mode has to be explicitly enabled using th:inline="javascript":
<script th:inline="javascript">
  ...
  var username = [[${session.user.name}]];
  ...
</script>
This will result in:
<script th:inline="javascript">
  ...
  var username = "Sebastian \"Fruity\" Applejuice";
  ...
</script>
Two important things to note in the code above:
First, that JavaScript inlining will not only output the required text, but also enclose it with quotes and JavaScript-escape its contents, so that the expression results are output as a well-formed JavaScript literal.
Second, that this is happening because we are outputting the ${session.user.name} expression as escaped, i.e. using a double-bracket expression: [[${session.user.name}]]. If instead we used unescaped like:
<script th:inline="javascript">
  ...
  var username = [(${session.user.name})];
  ...
</script>
The result would look like:
<script th:inline="javascript">
  ...
  var username = Sebastian "Fruity" Applejuice;
  ...
</script>
…which is malformed JavaScript code. But outputting something unescaped might be what we need if we are building parts of our script by means of appending inlined expressions, so it’s good to have this tool at hand.
JavaScript 자연 템플릿
The mentioned intelligence of the JavaScript inlining mechanism goes much further than just applying JavaScript-specific escaping and outputting expression results as valid literals.
For example, we can wrap our (escaped) inlined expressions in JavaScript comments like:
<script th:inline="javascript">
  ...
  var username = /*[[${session.user.name}]]*/ "Gertrud Kiwifruit";
  ...
</script>
And Thymeleaf will ignore everything we have written after the comment and before the semicolon (in this case 'Gertrud Kiwifruit'), so the result of executing this will look exactly like when we were not using the wrapping comments:
<script th:inline="javascript">
  ...
  var username = "Sebastian \"Fruity\" Applejuice";
  ...
</script>
But have another careful look at the original template code:
<script th:inline="javascript">
  ...
  var username = /*[[${session.user.name}]]*/ "Gertrud Kiwifruit";
  ...
</script>
Note how this is valid JavaScript code. And it will perfectly execute when you open your template file in a static manner (without executing it at a server).
So what we have here is a way to do JavaScript natural templates!
고급 인라인 평가 및 JavaScript 직렬화
An important thing to note regarding JavaScript inlining is that this expression evaluation is intelligent and not limited to Strings. Thymeleaf will correctly write in JavaScript syntax the following kinds of objects:
- Strings
- Numbers
- Booleans
- Arrays
- Collections
- Maps
- Beans (objects with getter and setter methods)
For example, if we had the following code:
<script th:inline="javascript">
  ...
  var user = /*[[${session.user}]]*/ null;
  ...
</script>
That ${session.user} expression will evaluate to a User object, and Thymeleaf will correctly convert it to Javascript syntax:
<script th:inline="javascript">
  ...
  var user = {"age":null,"firstName":"John","lastName":"Apricot",
              "name":"John Apricot","nationality":"Antarctica"};
  ...
</script>
The way this JavaScript serialization is done is by means of an implementation of the org.thymeleaf.standard.serializer.IStandardJavaScriptSerializer interface, which can be configured at the instance of the StandardDialect being used at the template engine.
The default implementation of this JS serialization mechanism will look for the Jackson library in the classpath and, if present, will use it. If not, it will apply a built-in serialization mechanism that covers the needs of most scenarios and produces similar results (but is less flexible).
12.4 CSS 인라인
Thymeleaf also allows the use of inlining in CSS <style> tags, such as:
<style th:inline="css">
  ...;
</style>
For example, say we have two variables set to two different String values:
classname = 'main elems'
align = 'center'
We could use them just like:
<style th:inline="css">
  .[[${classname}]] {
    text-align: [[${align}]];
  }
</style>
And the result would be:
<style th:inline="css">
  .main\ elems {
    text-align: center;
  }
</style>
Note how CSS inlining also bears some intelligence, just like JavaScript’s. Specifically, expressions output via escaped expressions like [[${classname}]] will be escaped as CSS identifiers. That is why our classname = 'main elems' has turned into main\ elems in the fragment of code above.
고급 기능: CSS 자연 템플릿 등
In an equivalent way to what was explained before for JavaScript, CSS inlining also allows for our <style> tags to work both statically and dynamically, i.e. as CSS natural templates by means of wrapping inlined expressions in comments. See:
<style th:inline="css">
  .main\ elems {
    text-align: /*[[${align}]]*/ left;
  }
</style>
13 텍스트 템플릿 모드
13.1 텍스트 구문
Three of the Thymeleaf template modes are considered textual: TEXT, JAVASCRIPT and CSS. This differentiates them from the markup template modes: HTML and XML.
The key difference between textual template modes and the markup ones is that in a textual template there are no tags into which to insert logic in the form of attributes, so we have to rely on other mechanisms.
The first and most basic of these mechanisms is inlining, which we have already detailed in the previous chapter. Inlining syntax is the most simple way to output results of expressions in textual template mode, so this is a perfectly valid template for a text email.
  Dear [(${name})],

  Please find attached the results of the report you requested
  with name "[(${report.name})]".

  Sincerely,
    The Reporter.
Even without tags, the example above is a complete and valid Thymeleaf template that can be executed in the TEXT template mode.
But in order to include more complex logic than mere output expressions, we need a new non-tag-based syntax:
[# th:each="item : ${items}"]
  - [(${item})]
[/]
Which is actually the condensed version of the more verbose:
[#th:block th:each="item : ${items}"]
  - [#th:block th:utext="${item}" /]
[/th:block]
Note how this new syntax is based on elements (i.e. processable tags) that are declared as [#element ...] instead of <element ...>. Elements are open like [#element ...] and closed like [/element], and standalone tags can be declared by minimizing the open element with a / in a way almost equivalent to XML tags: [#element ... /].
The Standard Dialect only contains a processor for one of these elements: the already-known th:block, though we could extend this in our dialects and create new elements in the usual way. Also, the th:block element ([#th:block ...] ... [/th:block]) is allowed to be abbreviated as the empty string ([# ...] ... [/]), so the above block is actually equivalent to:
[# th:each="item : ${items}"]
  - [# th:utext="${item}" /]
[/]
And given [# th:utext="${item}" /] is equivalent to an inlined unescaped expression, we could just use it in order to have less code. Thus we end up with the first fragment of code we saw above:
[# th:each="item : ${items}"]
  - [(${item})]
[/]
Note that the textual syntax requires full element balance (no unclosed tags) and quoted attributes – it’s more XML-style than HTML-style.
Let’s have a look at a more complete example of a TEXT template, a plain text email template:
Dear [(${customer.name})],

This is the list of our products:

[# th:each="prod : ${products}"]
   - [(${prod.name})]. Price: [(${prod.price})] EUR/kg
[/]

Thanks,
  The Thymeleaf Shop
After executing, the result of this could be something like:
Dear Mary Ann Blueberry,

This is the list of our products:

   - Apricots. Price: 1.12 EUR/kg
   - Bananas. Price: 1.78 EUR/kg
   - Apples. Price: 0.85 EUR/kg
   - Watermelon. Price: 1.91 EUR/kg

Thanks,
  The Thymeleaf Shop
And another example in JAVASCRIPT template mode, a greeter.js file, we process as a textual template and which result we call from our HTML pages. Note this is not a <script> block in an HTML template, but a .js file being processed as a template on its own:
var greeter = function() {

    var username = [[${session.user.name}]];

    [# th:each="salut : ${salutations}"]
      alert([[${salut}]] + " " + username);
    [/]

};
After executing, the result of this could be something like:
var greeter = function () {
  var username = 'Bertrand "Crunchy" Pear';

  alert("Hello" + " " + username);
  alert("Ol\u00E1" + " " + username);
  alert("Hola" + " " + username);
};
이스케이프된 요소 속성
In order to avoid interactions with parts of the template that might be processed in other modes (e.g. text-mode inlining inside an HTML template), Thymeleaf 3.0 allows the attributes in elements in its textual syntax to be escaped. So:
- Attributes in
TEXTtemplate mode will be HTML-unescaped. - Attributes in
JAVASCRIPTtemplate mode will be JavaScript-unescaped. - Attributes in
CSStemplate mode will be CSS-unescaped.
So this would be perfectly OK in a TEXT-mode template (note the >):
  [# th:if="${120<user.age}"]
     Congratulations!
  [/]
Of course that < would make no sense in a real text template, but it is a good idea if we are processing an HTML template with a th:inline="text" block containing the code above and we want to make sure our browser doesn’t take that <user.age for the name of an open tag when statically opening the file as a prototype.
13.2 확장성
One of the advantages of this syntax is that it is just as extensible as the markup one. Developers can still define their own dialects with custom elements and attributes, apply a prefix to them (optionally), and then use them in textual template modes:
[#myorg:dosomething myorg:importantattr="211"]some text[/myorg:dosomething]13.3 텍스트 프로토타입 전용 주석 블록: 코드 추가
The JAVASCRIPT and CSS template modes (not available for TEXT) allow including code between a special comment syntax /*[+...+]*/ so that Thymeleaf will automatically uncomment such code when processing the template:
var x = 23;

/*[+

var msg  = "This is a working application";

+]*/

var f = function() {
    ...
Will be executed as:
var x = 23;

var msg  = "This is a working application";

var f = function() {
...
You can include expressions inside these comments, and they will be evaluated:
var x = 23;

/*[+

var msg  = "Hello, " + [[${session.user.name}]];

+]*/

var f = function() {
...
13.4 텍스트 파서 레벨 주석 블록: 코드 제거
In a way similar to that of prototype-only comment blocks, all the three textual template modes (TEXT, JAVASCRIPT and CSS) make it possible to instruct Thymeleaf to remove code between special /*[- */ and /* -]*/ marks, like this:
var x = 23;

/*[- */

var msg  = "This is shown only when executed statically!";

/* -]*/

var f = function() {
...
Or this, in TEXT mode:
...
/*[- Note the user is obtained from the session, which must exist -]*/
Welcome [(${session.user.name})]!
...
13.5 자연 JavaScript 및 CSS 템플릿
As seen in the previous chapter, JavaScript and CSS inlining offer the possibility to include inlined expressions inside JavaScript/CSS comments, like:
...
var username = /*[[${session.user.name}]]*/ "Sebastian Lychee";
...
…which is valid JavaScript, and once executed could look like:
... var username = "John Apricot"; ...This same trick of enclosing inlined expressions inside comments can in fact be used for the entire textual mode syntax:
  /*[# th:if="${user.admin}"]*/
     alert('Welcome admin');
  /*[/]*/
That alert in the code above will be shown when the template is open statically – because it is 100% valid JavaScript –, and also when the template is run if the user is an admin. It is equivalent to:
  [# th:if="${user.admin}"]
     alert('Welcome admin');
  [/]
…which is actually the code to which the initial version is converted during template parsing.
Note however that wrapping elements in comments does not clean the lines they live in (to the right until a ; is found) as inlined output expressions do. That behaviour is reserved for inlined output expressions only.
So Thymeleaf 3.0 allows the development of complex JavaScript scripts and CSS style sheets in the form of natural templates, valid both as a prototype and as a working template.
14 식료품점을 위한 추가 페이지
Now we know a lot about using Thymeleaf, we can add some new pages to our website for order management.
Note that we will focus on HTML code, but you can have a look at the bundled source code if you want to see the corresponding controllers.
14.1 주문 목록
Let’s start by creating an order list page, /WEB-INF/templates/order/list.html:
<!DOCTYPE html>

<html xmlns:th="http://www.thymeleaf.org">
  <head>
    <title>Good Thymes Virtual Grocery</title>
    <meta http-equiv="Content-Type" content="text/html; charset=UTF-8" />
    <link
      rel="stylesheet"
      type="text/css"
      media="all"
      href="../../../css/gtvg.css"
      th:href="@{/css/gtvg.css}"
    />
  </head>

  <body>
    <h1>Order list</h1>

    <table>
      <tr>
        <th>DATE</th>
        <th>CUSTOMER</th>
        <th>TOTAL</th>
        <th></th>
      </tr>
      <tr th:each="o : ${orders}" th:class="${oStat.odd}? 'odd'">
        <td th:text="${#calendars.format(o.date,'dd/MMM/yyyy')}">
          13 jan 2011
        </td>
        <td th:text="${o.customer.name}">Frederic Tomato</td>
        <td th:text="${#aggregates.sum(o.orderLines.{purchasePrice * amount})}">
          23.32
        </td>
        <td>
          <a href="details.html" th:href="@{/order/details(orderId=${o.id})}"
            >view</a
          >
        </td>
      </tr>
    </table>

    <p>
      <a href="../home.html" th:href="@{/}">Return to home</a>
    </p>
  </body>
</html>
There’s nothing here that should surprise us, except for this little bit of OGNL magic:
<td th:text="${#aggregates.sum(o.orderLines.{purchasePrice * amount})}">
  23.32
</td>
What that does is, for each order line (OrderLine object) in the order, multiply its purchasePrice and amount properties (by calling the corresponding getPurchasePrice() and getAmount() methods) and return the result into a list of numbers, later aggregated by the #aggregates.sum(...) function in order to obtain the order total price.
You’ve got to love the power of OGNL.
14.2 주문 상세
Now for the order details page, in which we will make a heavy use of asterisk syntax:
<!DOCTYPE html>

<html xmlns:th="http://www.thymeleaf.org">
  <head>
    <title>Good Thymes Virtual Grocery</title>
    <meta http-equiv="Content-Type" content="text/html; charset=UTF-8" />
    <link
      rel="stylesheet"
      type="text/css"
      media="all"
      href="../../../css/gtvg.css"
      th:href="@{/css/gtvg.css}"
    />
  </head>

  <body th:object="${order}">
    <h1>Order details</h1>

    <div>
      <p><b>Code:</b> <span th:text="*{id}">99</span></p>
      <p>
        <b>Date:</b>
        <span th:text="*{#calendars.format(date,'dd MMM yyyy')}"
          >13 jan 2011</span
        >
      </p>
    </div>

    <h2>Customer</h2>

    <div th:object="*{customer}">
      <p><b>Name:</b> <span th:text="*{name}">Frederic Tomato</span></p>
      <p>
        <b>Since:</b>
        <span th:text="*{#calendars.format(customerSince,'dd MMM yyyy')}"
          >1 jan 2011</span
        >
      </p>
    </div>

    <h2>Products</h2>

    <table>
      <tr>
        <th>PRODUCT</th>
        <th>AMOUNT</th>
        <th>PURCHASE PRICE</th>
      </tr>
      <tr th:each="ol,row : *{orderLines}" th:class="${row.odd}? 'odd'">
        <td th:text="${ol.product.name}">Strawberries</td>
        <td th:text="${ol.amount}" class="number">3</td>
        <td th:text="${ol.purchasePrice}" class="number">23.32</td>
      </tr>
    </table>

    <div>
      <b>TOTAL:</b>
      <span th:text="*{#aggregates.sum(orderLines.{purchasePrice * amount})}"
        >35.23</span
      >
    </div>

    <p>
      <a href="list.html" th:href="@{/order/list}">Return to order list</a>
    </p>
  </body>
</html>
Not much really new here, except for this nested object selection:
<body th:object="${order}">
  ...

  <div th:object="*{customer}">
    <p><b>Name:</b> <span th:text="*{name}">Frederic Tomato</span></p>
    ...
  </div>

  ...
</body>
…which makes that *{name} equivalent to:
<p>
  <b>Name:</b> <span th:text="${order.customer.name}">Frederic Tomato</span>
</p>
15 구성에 대한 추가 정보
15.1 템플릿 리졸버
For our Good Thymes Virtual Grocery, we chose an ITemplateResolver implementation called WebApplicationTemplateResolver that allowed us to obtain templates as resources from the application resources (the Servlet Context in a Servlet-based webapp).
Besides giving us the ability to create our own template resolver by implementing ITemplateResolver, Thymeleaf includes four implementations out of the box:
org.thymeleaf.templateresolver.ClassLoaderTemplateResolver, which resolves templates as classloader resources, like:return Thread.currentThread().getContextClassLoader().getResourceAsStream(template);org.thymeleaf.templateresolver.FileTemplateResolver, which resolves templates as files from the file system, like:return new FileInputStream(new File(template));org.thymeleaf.templateresolver.UrlTemplateResolver, which resolves templates as URLs (even non-local ones), like:return (new URL(template)).openStream();org.thymeleaf.templateresolver.StringTemplateResolver, which resolves templates directly as theStringbeing specified astemplate(or template name, which in this case is obviously much more than a mere name):return new StringReader(templateName);
All of the pre-bundled implementations of ITemplateResolver allow the same set of configuration parameters, which include:
Prefix and suffix (as already seen):
templateResolver.setPrefix("/WEB-INF/templates/");
templateResolver.setSuffix(".html");
Template aliases that allow the use of template names that do not directly correspond to file names. If both suffix/prefix and alias exist, alias will be applied before prefix/suffix:
templateResolver.addTemplateAlias("adminHome","profiles/admin/home");
templateResolver.setTemplateAliases(aliasesMap);
Encoding to be applied when reading templates:
templateResolver.setCharacterEncoding("UTF-8");Template mode to be used:
// Default is HTML
templateResolver.setTemplateMode("XML");
Default mode for template cache, and patterns for defining whether specific templates are cacheable or not:
// Default is true
templateResolver.setCacheable(false);
templateResolver.getCacheablePatternSpec().addPattern("/users/*");
TTL in milliseconds for parsed template cache entries originated in this template resolver. If not set, the only way to remove an entry from the cache will be to exceed the cache max size (oldest entry will be removed).
// Default is no TTL (only cache size exceeded would remove entries)
templateResolver.setCacheTTLMs(60000L);
The Thymeleaf + Spring integration packages offer a
SpringResourceTemplateResolverimplementation which uses all the Spring infrastructure for accessing and reading resources in applications, and which is the recommended implementation in Spring-enabled applications.
템플릿 리졸버 체인
Also, a Template Engine can specify several template resolvers, in which case an order can be established between them for template resolution so that, if the first one is not able to resolve the template, the second one is asked, and so on:
ClassLoaderTemplateResolver classLoaderTemplateResolver = new ClassLoaderTemplateResolver();
classLoaderTemplateResolver.setOrder(Integer.valueOf(1));

WebApplicationTemplateResolver webApplicationTemplateResolver =
        new WebApplicationTemplateResolver(application);
webApplicationTemplateResolver.setOrder(Integer.valueOf(2));

templateEngine.addTemplateResolver(classLoaderTemplateResolver);
templateEngine.addTemplateResolver(webApplicationTemplateResolver);
When several template resolvers are applied, it is recommended to specify patterns for each template resolver so that Thymeleaf can quickly discard those template resolvers that are not meant to resolve the template, enhancing performance. Doing this is not a requirement, but a recommendation:
ClassLoaderTemplateResolver classLoaderTemplateResolver = new ClassLoaderTemplateResolver();
classLoaderTemplateResolver.setOrder(Integer.valueOf(1));
// This classloader will not be even asked for any templates not matching these patterns
classLoaderTemplateResolver.getResolvablePatternSpec().addPattern("/layout/*.html");
classLoaderTemplateResolver.getResolvablePatternSpec().addPattern("/menu/*.html");

WebApplicationTemplateResolver webApplicationTemplateResolver =
        new WebApplicationTemplateResolver(application);
webApplicationTemplateResolver.setOrder(Integer.valueOf(2));
If these resolvable patterns are not specified, we will be relying on the specific capabilities of each of the ITemplateResolver implementations we are using. Note that not all implementations might be able to determine the existence of a template before resolving, and thus could always consider a template as resolvable and break the resolution chain (not allowing other resolvers to check for the same template), but then be unable to read the real resource.
All the ITemplateResolver implementations that are included with core Thymeleaf include a mechanism that will allow us to make the resolvers really check if a resource exists before considering it resolvable. It is the checkExistence flag, which works like:
ClassLoaderTemplateResolver classLoaderTemplateResolver = new ClassLoaderTemplateResolver();
classLoaderTemplateResolver.setOrder(Integer.valueOf(1));
classLoaderTempalteResolver.setCheckExistence(true);
This checkExistence flag forces the resolver perform a real check for resource existence during the resolution phase (and let the following resolver in the chain be called if existence check returns false). While this might sound good in every case, in most cases this will mean a double access to the resource itself (once for checking existence, another time for reading it), and could be a performance issue in some scenarios, e.g. remote URL-based template resources – a potential performance issue that might anyway get largely mitigated by the use of the template cache (in which case templates will only be resolved the first time they are accessed).
15.2 메시지 리졸버
We did not explicitly specify a Message Resolver implementation for our Grocery application, and as it was explained before, this meant that the implementation being used was an org.thymeleaf.messageresolver.StandardMessageResolver object.
StandardMessageResolver is the standard implementation of the IMessageResolver interface, but we could create our own if we wanted, adapted to the specific needs of our application.
The Thymeleaf + Spring integration packages offer by default an
IMessageResolverimplementation which uses the standard Spring way of retrieving externalized messages, by usingMessageSourcebeans declared at the Spring Application Context.
표준 메시지 리졸버
So how does StandardMessageResolver look for the messages requested at a specific template?
If the template name is home and it is located in /WEB-INF/templates/home.html, and the requested locale is gl_ES then this resolver will look for messages in the following files, in this order:
/WEB-INF/templates/home_gl_ES.properties/WEB-INF/templates/home_gl.properties/WEB-INF/templates/home.properties
Refer to the JavaDoc documentation of the StandardMessageResolver class for more detail on how the complete message resolution mechanism works.
메시지 리졸버 구성
What if we wanted to add a message resolver (or more) to the Template Engine? Easy:
// For setting only one
templateEngine.setMessageResolver(messageResolver);

// For setting more than one
templateEngine.addMessageResolver(messageResolver);
And why would we want to have more than one message resolver? For the same reason as template resolvers: message resolvers are ordered and if the first one cannot resolve a specific message, the second one will be asked, then the third, etc.
15.3 변환 서비스
The conversion service that enables us to perform data conversion and formatting operations by means of the double-brace syntax (${{...}}) is actually a feature of the Standard Dialect, not of the Thymeleaf Template Engine itself.
As such, the way to configure it is by setting our custom implementation of the IStandardConversionService interface directly into the instance of StandardDialect that is being configured into the template engine. Like:
IStandardConversionService customConversionService = ...

StandardDialect dialect = new StandardDialect();
dialect.setConversionService(customConversionService);

templateEngine.setDialect(dialect);
Note that the thymeleaf-spring3 and thymeleaf-spring4 packages contain the
SpringStandardDialect, and this dialect already comes pre-configured with an implementation ofIStandardConversionServicethat integrates Spring’s own Conversion Service infrastructure into Thymeleaf.
15.4 로깅
Thymeleaf pays quite a lot of attention to logging, and always tries to offer the maximum amount of useful information through its logging interface.
The logging library used is slf4j, which in fact acts as a bridge to whichever logging implementation we might want to use in our application (for example, log4j).
Thymeleaf classes will log TRACE, DEBUG and INFO-level information, depending on the level of detail we desire, and besides general logging it will use three special loggers associated with the TemplateEngine class which we can configure separately for different purposes:
org.thymeleaf.TemplateEngine.CONFIGwill output detailed configuration of the library during initialization.org.thymeleaf.TemplateEngine.TIMERwill output information about the amount of time taken to process each template (useful for benchmarking!)org.thymeleaf.TemplateEngine.cacheis the prefix for a set of loggers that output specific information about the caches. Although the names of the cache loggers are configurable by the user and thus could change, by default they are:org.thymeleaf.TemplateEngine.cache.TEMPLATE_CACHEorg.thymeleaf.TemplateEngine.cache.EXPRESSION_CACHE
An example configuration for Thymeleaf’s logging infrastructure, using log4j, could be:
log4j.logger.org.thymeleaf=DEBUG
log4j.logger.org.thymeleaf.TemplateEngine.CONFIG=TRACE
log4j.logger.org.thymeleaf.TemplateEngine.TIMER=TRACE
log4j.logger.org.thymeleaf.TemplateEngine.cache.TEMPLATE_CACHE=TRACE
16 템플릿 캐시
Thymeleaf works thanks to a set of parsers – for markup and text – that parse templates into sequences of events (open tag, text, close tag, comment, etc.) and a series of processors – one for each type of behaviour that needs to be applied – that modify the template parsed event sequence in order to create the results we expect by combining the original template with our data.
It also includes – by default – a cache that stores parsed templates; the sequence of events resulting from reading and parsing template files before processing them. This is especially useful when working in a web application, and builds on the following concepts:
- Input/Output is almost always the slowest part of any application. In-memory processing is extremely quick by comparison.
- Cloning an existing in-memory event sequence is always much quicker than reading a template file, parsing it and creating a new event sequence for it.
- Web applications usually have only a few dozen templates.
- Template files are small-to-medium size, and they are not modified while the application is running.
This all leads to the idea that caching the most used templates in a web application is feasible without wasting large amounts of memory, and also that it will save a lot of time that would be spent on input/output operations on a small set of files that, in fact, never change.
And how can we take control of this cache? First, we’ve learned before that we can enable or disable it at the Template Resolver, even acting only on specific templates:
// Default is true
templateResolver.setCacheable(false);
templateResolver.getCacheablePatternSpec().addPattern("/users/*");
Also, we could modify its configuration by establishing our own Cache Manager object, which could be an instance of the default StandardCacheManager implementation:
// Default is 200
StandardCacheManager cacheManager = new StandardCacheManager();
cacheManager.setTemplateCacheMaxSize(100);
...
templateEngine.setCacheManager(cacheManager);
Refer to the javadoc API of org.thymeleaf.cache.StandardCacheManager for more info on configuring the caches.
Entries can be manually removed from the template cache:
// Clear the cache completely
templateEngine.clearTemplateCache();

// Clear a specific template from the cache
templateEngine.clearTemplateCacheFor("/users/userList");
17 분리된 템플릿 로직
17.1 분리된 로직: 개념
So far we have worked for our Grocery Store with templates done the usual way, with logic being inserted into our templates in the form of attributes.
But Thymeleaf also allows us to completely decouple the template markup from its logic, allowing the creation of completely logic-less markup templates in the HTML and XML template modes.
The main idea is that template logic will be defined in a separate logic file (more exactly a logic resource, as it doesn’t need to be a file). By default, that logic resource will be an additional file living in the same place (e.g. folder) as the template file, with the same name but with .th.xml extension:
/templates
+->/home.html
+->/home.th.xml
So the home.html file can be completely logic-less. It might look like this:
<!DOCTYPE html>
<html>
  <body>
    <table id="usersTable">
      <tr>
        <td class="username">Jeremy Grapefruit</td>
        <td class="usertype">Normal User</td>
      </tr>
      <tr>
        <td class="username">Alice Watermelon</td>
        <td class="usertype">Administrator</td>
      </tr>
    </table>
  </body>
</html>
Absolutely no Thymeleaf code there. This is a template file that a designer with no Thymeleaf or templating knowledge could have created, edited and/or understood. Or a fragment of HTML provided by some external system with no Thymeleaf hooks at all.
Let’s now turn that home.html template into a Thymeleaf template by creating our additional home.th.xml file like this:
<?xml version="1.0"?>
<thlogic>
  <attr sel="#usersTable" th:remove="all-but-first">
    <attr sel="/tr[0]" th:each="user : ${users}">
      <attr sel="td.username" th:text="${user.name}" />
      <attr sel="td.usertype" th:text="#{|user.type.${user.type}|}" />
    </attr>
  </attr>
</thlogic>
Here we can see a lot of <attr> tags inside a thlogic block. Those <attr> tags perform attribute injection on nodes of the original template selected by means of their sel attributes, which contain Thymeleaf markup selectors (actually AttoParser markup selectors).
Also note that <attr> tags can be nested so that their selectors are appended. That sel="/tr[0]" above, for example, will be processed as sel="#usersTable/tr[0]". And the selector for the user name <td> will be processed as sel="#usersTable/tr[0]//td.username".
So once merged, both files seen above will be the same as:
<!DOCTYPE html>
<html>
  <body>
    <table id="usersTable" th:remove="all-but-first">
      <tr th:each="user : ${users}">
        <td class="username" th:text="${user.name}">Jeremy Grapefruit</td>
        <td class="usertype" th:text="#{|user.type.${user.type}|}">
          Normal User
        </td>
      </tr>
      <tr>
        <td class="username">Alice Watermelon</td>
        <td class="usertype">Administrator</td>
      </tr>
    </table>
  </body>
</html>
This looks more familiar, and is indeed less verbose than creating two separate files. But the advantage of decoupled templates is that we can give for our templates total independence from Thymeleaf, and therefore better maintainability from the design standpoint.
Of course some contracts between designers or developers will still be needed – e.g. the fact that the users <table> will need an id="usersTable" –, but in many scenarios a pure-HTML template will be a much better communication artifact between design and development teams.
17.2 분리된 템플릿 구성
분리된 템플릿 활성화
Decoupled logic will not be expected for every template by default. Instead, the configured template resolvers (implementations of ITemplateResolver) will need to specifically mark the templates they resolve as using decoupled logic.
Except for StringTemplateResolver (which does not allow decoupled logic), all other out-of-the-box implementations of ITemplateResolver will provide a flag called useDecoupledLogic that will mark all templates resolved by that resolver as potentially having all or part of its logic living in a separate resource:
final WebApplicationTemplateResolver templateResolver =
        new WebApplicationTemplateResolver(application);
...
templateResolver.setUseDecoupledLogic(true);
결합된 로직과 분리된 로직 혼합
Decoupled template logic, when enabled, is not a requirement. When enabled, it means that the engine will look for a resource containing decoupled logic, parsing and merging it with the original template if it exists. No error will be thrown if the decoupled logic resource does not exist.
Also, in the same template we can mix both coupled and decoupled logic, for example by adding some Thymeleaf attributes at the original template file but leaving others for the separate decoupled logic file. The most common case for this is using the new (in v3.0) th:ref attribute.
17.3 th:ref 속성
th:ref is only a marker attribute. It does nothing from the processing standpoint and simply disappears when the template is processed, but its usefulness lies in the fact that it acts as a markup reference, i.e. it can be resolved by name from a markup selector just like a tag name or a fragment (th:fragment).
So if we have a selector like:
<attr sel="whatever" .../>This will match:
- Any
<whatever>tags. - Any tags with a
th:fragment="whatever"attribute. - Any tags with a
th:ref="whatever"attribute.
What is the advantage of th:ref against, for example, using a pure-HTML id attribute? Merely the fact that we might not want to add so many id and class attributes to our tags to act as logic anchors, which might end up polluting our output.
And in the same sense, what is the disadvantage of th:ref? Well, obviously that we’d be adding a bit of Thymeleaf logic (“logic”) to our templates.
Note this applicability of the th:ref attribute does not only apply to decoupled logic template files: it works the same in other types of scenarios, like in fragment expressions (~{...}).
17.4 분리된 템플릿의 성능 영향
The impact is extremely small. When a resolved template is marked to use decoupled logic and it is not cached, the template logic resource will be resolved first, parsed and processed into a sequence of instructions in-memory: basically a list of attributes to be injected to each markup selector.
But this is the only additional step required because, after this, the real template will be parsed, and while it is parsed these attributes will be injected on-the-fly by the parser itself, thanks to the advanced capabilities for node selection in AttoParser. So parsed nodes will come out of the parser as if they had their injected attributes written in the original template file.
The biggest advantage of this? When a template is configured to be cached, it will be cached already containing the injected attributes. So the overhead of using decoupled templates for cacheable templates, once they are cached, will be absolutely zero.
17.5 분리된 로직의 해결
The way Thymeleaf resolves the decoupled logic resources corresponding to each template is configurable by the user. It is determined by an extension point, the org.thymeleaf.templateparser.markup.decoupled.IDecoupledTemplateLogicResolver, for which a default implementation is provided: StandardDecoupledTemplateLogicResolver.
What does this standard implementation do?
- First, it applies a
prefixand asuffixto the base name of the template resource (obtained by means of itsITemplateResource#getBaseName()method). Both prefix and suffix can be configured and, by default, the prefix will be empty and the suffix will be.th.xml. - Second, it asks the template resource to resolve a relative resource with the computed name by means of its
ITemplateResource#relative(String relativeLocation)method.
The specific implementation of IDecoupledTemplateLogicResolver to be used can be configured at the TemplateEngine easily:
final StandardDecoupledTemplateLogicResolver decoupledresolver =
        new StandardDecoupledTemplateLogicResolver();
decoupledResolver.setPrefix("../viewlogic/");
...
templateEngine.setDecoupledTemplateLogicResolver(decoupledResolver);
18 부록 A: 표현식 기본 객체
일부 객체와 변수 맵은 항상 호출할 수 있습니다. 이들을 살펴봅시다:
기본 객체
#ctx : 컨텍스트 객체. 우리의 환경(독립 실행형 또는 웹)에 따라
org.thymeleaf.context.IContext또는org.thymeleaf.context.IWebContext의 구현체입니다.#vars와#root는 동일한 객체의 동의어이지만,#ctx를 사용하는 것이 권장됩니다.
/*
 * ======================================================================
 * org.thymeleaf.context.IContext 클래스의 javadoc API 참조
 * ======================================================================
 */

${#ctx.locale}
${#ctx.variableNames}

/*
 * ======================================================================
 * org.thymeleaf.context.IWebContext 클래스의 javadoc API 참조
 * ======================================================================
 */

${#ctx.request}
${#ctx.response}
${#ctx.session}
${#ctx.servletContext}- #locale : 현재 요청과 연관된
java.util.Locale에 직접 접근합니다.
${#locale}요청/세션 속성 등을 위한 웹 컨텍스트 네임스페이스
Thymeleaf를 웹 환경에서 사용할 때, 요청 매개변수, 세션 속성 및 애플리케이션 속성에 접근하기 위한 일련의 단축키를 사용할 수 있습니다:
이들은 컨텍스트 객체가 아니라 변수로 컨텍스트에 추가된 맵이므로,
#없이 접근합니다. 어떤 면에서 이들은 네임스페이스처럼 작동합니다.
- param : 요청 매개변수를 검색하기 위해 사용합니다.
${param.foo}는foo요청 매개변수의 값을 가진String[]이므로, 일반적으로 첫 번째 값을 가져오기 위해${param.foo[0]}를 사용합니다.
/*
 * ============================================================================
 * org.thymeleaf.context.WebRequestParamsVariablesMap 클래스의 javadoc API 참조
 * ============================================================================
 */

${param.foo}              // 요청 매개변수 'foo'의 값을 가진 String[]를 검색합니다
${param.size()}
${param.isEmpty()}
${param.containsKey('foo')}
...- session : 세션 속성을 검색하기 위해 사용합니다.
/*
 * ======================================================================
 * org.thymeleaf.context.WebSessionVariablesMap 클래스의 javadoc API 참조
 * ======================================================================
 */

${session.foo}                 // 세션 속성 'foo'를 검색합니다
${session.size()}
${session.isEmpty()}
${session.containsKey('foo')}
...- application : 애플리케이션/서블릿 컨텍스트 속성을 검색하기 위해 사용합니다.
/*
 * =============================================================================
 * org.thymeleaf.context.WebServletContextVariablesMap 클래스의 javadoc API 참조
 * =============================================================================
 */

${application.foo}              // ServletContext 속성 'foo'를 검색합니다
${application.size()}
${application.isEmpty()}
${application.containsKey('foo')}
...
요청 속성(요청 매개변수와는 달리)에 접근하기 위해 네임스페이스를 지정할 필요가 없음에 주목하세요. 모든 요청 속성은 자동으로 컨텍스트 루트의 변수로 컨텍스트에 추가되기 때문입니다:
${myRequestAttribute}19 부록 B: 표현식 유틸리티 객체
실행 정보
- #execInfo : Thymeleaf 표준 표현식 내에서 처리 중인 템플릿에 대한 유용한 정보를 제공하는 표현식 객체입니다.
/*
 * ======================================================================
 * org.thymeleaf.expression.ExecutionInfo 클래스의 javadoc API 참조
 * ======================================================================
 */

/*
 * '리프' 템플릿의 이름과 모드를 반환합니다. 이는 처리 중인 이벤트가 파싱된 템플릿을 의미합니다.
 * 따라서 이 코드 조각이 루트 템플릿 "A"가 아니라 "B"라는 다른 템플릿에서 "A"로 삽입되는
 * 프래그먼트에 있다면, 이는 이름으로 "B"를, 모드로 B의 템플릿 모드를 반환할 것입니다.
 */
${#execInfo.templateName}
${#execInfo.templateMode}

/*
 * '루트' 템플릿의 이름과 모드를 반환합니다. 이는 템플릿 엔진이 원래 처리하도록 요청받은
 * 템플릿을 의미합니다. 따라서 이 코드 조각이 루트 템플릿 "A"가 아니라 "B"라는 다른 템플릿에서
 * "A"로 삽입되는 프래그먼트에 있더라도, 여전히 "A"와 A의 템플릿 모드를 반환할 것입니다.
 */
${#execInfo.processedTemplateName}
${#execInfo.processedTemplateMode}

/*
 * 처리 중인 템플릿의 스택(실제로는 List<String> 또는 List<TemplateMode>)을 반환합니다.
 * 첫 번째 요소는 'processedTemplate'(루트)이 되고, 마지막 요소는 '리프' 템플릿이 되며,
 * 중간에는 루트에서 리프까지 도달하기 위해 중첩된 방식으로 삽입된 모든 프래그먼트가 나타납니다.
 */
${#execInfo.templateNames}
${#execInfo.templateModes}

/*
 * 'templateNames'와 'templateModes'와 유사하게(그리고 동일한 순서로) 처리 중인
 * 템플릿의 스택을 반환하지만, 전체 템플릿 메타데이터가 포함된 List<TemplateData>를 반환합니다.
 */
${#execInfo.templateStack}
메시지 (Messages)
- #messages :
#{...}구문을 사용하여 얻을 수 있는 것과 동일한 방식으로 변수 표현식 내에서 외부화된 메시지를 얻기 위한 유틸리티 메서드입니다.
/*
 * ======================================================================
 * org.thymeleaf.expression.Messages 클래스의 javadoc API 참조
 * ======================================================================
 */

/*
 * 외부화된 메시지를 얻습니다. 단일 키, 키와 인수, 또는 키의 배열/리스트/세트를 받을 수 있습니다
 * (이 경우 외부화된 메시지의 배열/리스트/세트를 반환합니다).
 * 메시지를 찾을 수 없는 경우, 기본 메시지(예: '??msgKey??')가 반환됩니다.
 */
${#messages.msg('msgKey')}
${#messages.msg('msgKey', param1)}
${#messages.msg('msgKey', param1, param2)}
${#messages.msg('msgKey', param1, param2, param3)}
${#messages.msgWithParams('msgKey', new Object[] {param1, param2, param3, param4})}
${#messages.arrayMsg(messageKeyArray)}
${#messages.listMsg(messageKeyList)}
${#messages.setMsg(messageKeySet)}

/*
 * 외부화된 메시지를 얻거나 null을 반환합니다. 지정된 키에 대한 메시지를 찾을 수 없는 경우
 * 기본 메시지 대신 null이 반환됩니다.
 */
${#messages.msgOrNull('msgKey')}
${#messages.msgOrNull('msgKey', param1)}
${#messages.msgOrNull('msgKey', param1, param2)}
${#messages.msgOrNull('msgKey', param1, param2, param3)}
${#messages.msgOrNullWithParams('msgKey', new Object[] {param1, param2, param3, param4})}
${#messages.arrayMsgOrNull(messageKeyArray)}
${#messages.listMsgOrNull(messageKeyList)}
${#messages.setMsgOrNull(messageKeySet)}
URIs/URLs
- #uris : utility object for performing URI/URL operations (esp. escaping/unescaping) inside Thymeleaf Standard Expressions.
/*
 * ======================================================================
 * See javadoc API for class org.thymeleaf.expression.Uris
 * ======================================================================
 */

/*
 * Escape/Unescape as a URI/URL path
 */
${#uris.escapePath(uri)}
${#uris.escapePath(uri, encoding)}
${#uris.unescapePath(uri)}
${#uris.unescapePath(uri, encoding)}

/*
 * Escape/Unescape as a URI/URL path segment (between '/' symbols)
 */
${#uris.escapePathSegment(uri)}
${#uris.escapePathSegment(uri, encoding)}
${#uris.unescapePathSegment(uri)}
${#uris.unescapePathSegment(uri, encoding)}

/*
 * Escape/Unescape as a Fragment Identifier (#frag)
 */
${#uris.escapeFragmentId(uri)}
${#uris.escapeFragmentId(uri, encoding)}
${#uris.unescapeFragmentId(uri)}
${#uris.unescapeFragmentId(uri, encoding)}

/*
 * Escape/Unescape as a Query Parameter (?var=value)
 */
${#uris.escapeQueryParam(uri)}
${#uris.escapeQueryParam(uri, encoding)}
${#uris.unescapeQueryParam(uri)}
${#uris.unescapeQueryParam(uri, encoding)}
변환 (Conversions)
- #conversions : utility object that allows the execution of the Conversion Service at any point of a template:
/*
 * ======================================================================
 * See javadoc API for class org.thymeleaf.expression.Conversions
 * ======================================================================
 */

/*
 * Execute the desired conversion of the 'object' value into the
 * specified class.
 */
${#conversions.convert(object, 'java.util.TimeZone')}
${#conversions.convert(object, targetClass)}
날짜
- #dates : utility methods for
java.util.Dateobjects:
/*
 * ======================================================================
 * See javadoc API for class org.thymeleaf.expression.Dates
 * ======================================================================
 */

/*
 * Format date with the standard locale format
 * Also works with arrays, lists or sets
 */
${#dates.format(date)}
${#dates.arrayFormat(datesArray)}
${#dates.listFormat(datesList)}
${#dates.setFormat(datesSet)}

/*
 * Format date with the ISO8601 format
 * Also works with arrays, lists or sets
 */
${#dates.formatISO(date)}
${#dates.arrayFormatISO(datesArray)}
${#dates.listFormatISO(datesList)}
${#dates.setFormatISO(datesSet)}

/*
 * Format date with the specified pattern
 * Also works with arrays, lists or sets
 */
${#dates.format(date, 'dd/MMM/yyyy HH:mm')}
${#dates.arrayFormat(datesArray, 'dd/MMM/yyyy HH:mm')}
${#dates.listFormat(datesList, 'dd/MMM/yyyy HH:mm')}
${#dates.setFormat(datesSet, 'dd/MMM/yyyy HH:mm')}

/*
 * Obtain date properties
 * Also works with arrays, lists or sets
 */
${#dates.day(date)}                    // also arrayDay(...), listDay(...), etc.
${#dates.month(date)}                  // also arrayMonth(...), listMonth(...), etc.
${#dates.monthName(date)}              // also arrayMonthName(...), listMonthName(...), etc.
${#dates.monthNameShort(date)}         // also arrayMonthNameShort(...), listMonthNameShort(...), etc.
${#dates.year(date)}                   // also arrayYear(...), listYear(...), etc.
${#dates.dayOfWeek(date)}              // also arrayDayOfWeek(...), listDayOfWeek(...), etc.
${#dates.dayOfWeekName(date)}          // also arrayDayOfWeekName(...), listDayOfWeekName(...), etc.
${#dates.dayOfWeekNameShort(date)}     // also arrayDayOfWeekNameShort(...), listDayOfWeekNameShort(...), etc.
${#dates.hour(date)}                   // also arrayHour(...), listHour(...), etc.
${#dates.minute(date)}                 // also arrayMinute(...), listMinute(...), etc.
${#dates.second(date)}                 // also arraySecond(...), listSecond(...), etc.
${#dates.millisecond(date)}            // also arrayMillisecond(...), listMillisecond(...), etc.

/*
 * Create date (java.util.Date) objects from its components
 */
${#dates.create(year,month,day)}
${#dates.create(year,month,day,hour,minute)}
${#dates.create(year,month,day,hour,minute,second)}
${#dates.create(year,month,day,hour,minute,second,millisecond)}

/*
 * Create a date (java.util.Date) object for the current date and time
 */
${#dates.createNow()}

${#dates.createNowForTimeZone()}

/*
 * Create a date (java.util.Date) object for the current date (time set to 00:00)
 */
${#dates.createToday()}

${#dates.createTodayForTimeZone()}
캘린더
- #calendars : analogous to
#dates, but forjava.util.Calendarobjects:
/*
 * ======================================================================
 * See javadoc API for class org.thymeleaf.expression.Calendars
 * ======================================================================
 */

/*
 * Format calendar with the standard locale format
 * Also works with arrays, lists or sets
 */
${#calendars.format(cal)}
${#calendars.arrayFormat(calArray)}
${#calendars.listFormat(calList)}
${#calendars.setFormat(calSet)}

/*
 * Format calendar with the ISO8601 format
 * Also works with arrays, lists or sets
 */
${#calendars.formatISO(cal)}
${#calendars.arrayFormatISO(calArray)}
${#calendars.listFormatISO(calList)}
${#calendars.setFormatISO(calSet)}

/*
 * Format calendar with the specified pattern
 * Also works with arrays, lists or sets
 */
${#calendars.format(cal, 'dd/MMM/yyyy HH:mm')}
${#calendars.arrayFormat(calArray, 'dd/MMM/yyyy HH:mm')}
${#calendars.listFormat(calList, 'dd/MMM/yyyy HH:mm')}
${#calendars.setFormat(calSet, 'dd/MMM/yyyy HH:mm')}

/*
 * Obtain calendar properties
 * Also works with arrays, lists or sets
 */
${#calendars.day(date)}                // also arrayDay(...), listDay(...), etc.
${#calendars.month(date)}              // also arrayMonth(...), listMonth(...), etc.
${#calendars.monthName(date)}          // also arrayMonthName(...), listMonthName(...), etc.
${#calendars.monthNameShort(date)}     // also arrayMonthNameShort(...), listMonthNameShort(...), etc.
${#calendars.year(date)}               // also arrayYear(...), listYear(...), etc.
${#calendars.dayOfWeek(date)}          // also arrayDayOfWeek(...), listDayOfWeek(...), etc.
${#calendars.dayOfWeekName(date)}      // also arrayDayOfWeekName(...), listDayOfWeekName(...), etc.
${#calendars.dayOfWeekNameShort(date)} // also arrayDayOfWeekNameShort(...), listDayOfWeekNameShort(...), etc.
${#calendars.hour(date)}               // also arrayHour(...), listHour(...), etc.
${#calendars.minute(date)}             // also arrayMinute(...), listMinute(...), etc.
${#calendars.second(date)}             // also arraySecond(...), listSecond(...), etc.
${#calendars.millisecond(date)}        // also arrayMillisecond(...), listMillisecond(...), etc.

/*
 * Create calendar (java.util.Calendar) objects from its components
 */
${#calendars.create(year,month,day)}
${#calendars.create(year,month,day,hour,minute)}
${#calendars.create(year,month,day,hour,minute,second)}
${#calendars.create(year,month,day,hour,minute,second,millisecond)}

${#calendars.createForTimeZone(year,month,day,timeZone)}
${#calendars.createForTimeZone(year,month,day,hour,minute,timeZone)}
${#calendars.createForTimeZone(year,month,day,hour,minute,second,timeZone)}
${#calendars.createForTimeZone(year,month,day,hour,minute,second,millisecond,timeZone)}

/*
 * Create a calendar (java.util.Calendar) object for the current date and time
 */
${#calendars.createNow()}

${#calendars.createNowForTimeZone()}

/*
 * Create a calendar (java.util.Calendar) object for the current date (time set to 00:00)
 */
${#calendars.createToday()}

${#calendars.createTodayForTimeZone()}
시간 (java.time)
- #temporals : deal with date/time objects from the JDK8+
java.timeAPI:
/*
 * ======================================================================
 * See javadoc API for class org.thymeleaf.expression.Temporals
 * ======================================================================
 */

/*
 *
 * Format date with the standard locale format
 * Also works with arrays, lists or sets
 */
${#temporals.format(temporal)}
${#temporals.arrayFormat(temporalsArray)}
${#temporals.listFormat(temporalsList)}
${#temporals.setFormat(temporalsSet)}

/*
 * Format date with the standard format for the provided locale
 * Also works with arrays, lists or sets
 */
${#temporals.format(temporal, locale)}
${#temporals.arrayFormat(temporalsArray, locale)}
${#temporals.listFormat(temporalsList, locale)}
${#temporals.setFormat(temporalsSet, locale)}

/*
 * Format date with the specified pattern
 * SHORT, MEDIUM, LONG and FULL can also be specified to used the default java.time.format.FormatStyle patterns
 * Also works with arrays, lists or sets
 */
${#temporals.format(temporal, 'dd/MMM/yyyy HH:mm')}
${#temporals.format(temporal, 'dd/MMM/yyyy HH:mm', 'Europe/Paris')}
${#temporals.arrayFormat(temporalsArray, 'dd/MMM/yyyy HH:mm')}
${#temporals.listFormat(temporalsList, 'dd/MMM/yyyy HH:mm')}
${#temporals.setFormat(temporalsSet, 'dd/MMM/yyyy HH:mm')}

/*
 * Format date with the specified pattern and locale
 * Also works with arrays, lists or sets
 */
${#temporals.format(temporal, 'dd/MMM/yyyy HH:mm', locale)}
${#temporals.arrayFormat(temporalsArray, 'dd/MMM/yyyy HH:mm', locale)}
${#temporals.listFormat(temporalsList, 'dd/MMM/yyyy HH:mm', locale)}
${#temporals.setFormat(temporalsSet, 'dd/MMM/yyyy HH:mm', locale)}

/*
 * Format date with ISO-8601 format
 * Also works with arrays, lists or sets
 */
${#temporals.formatISO(temporal)}
${#temporals.arrayFormatISO(temporalsArray)}
${#temporals.listFormatISO(temporalsList)}
${#temporals.setFormatISO(temporalsSet)}

/*
 * Obtain date properties
 * Also works with arrays, lists or sets
 */
${#temporals.day(temporal)}                    // also arrayDay(...), listDay(...), etc.
${#temporals.month(temporal)}                  // also arrayMonth(...), listMonth(...), etc.
${#temporals.monthName(temporal)}              // also arrayMonthName(...), listMonthName(...), etc.
${#temporals.monthNameShort(temporal)}         // also arrayMonthNameShort(...), listMonthNameShort(...), etc.
${#temporals.year(temporal)}                   // also arrayYear(...), listYear(...), etc.
${#temporals.dayOfWeek(temporal)}              // also arrayDayOfWeek(...), listDayOfWeek(...), etc.
${#temporals.dayOfWeekName(temporal)}          // also arrayDayOfWeekName(...), listDayOfWeekName(...), etc.
${#temporals.dayOfWeekNameShort(temporal)}     // also arrayDayOfWeekNameShort(...), listDayOfWeekNameShort(...), etc.
${#temporals.hour(temporal)}                   // also arrayHour(...), listHour(...), etc.
${#temporals.minute(temporal)}                 // also arrayMinute(...), listMinute(...), etc.
${#temporals.second(temporal)}                 // also arraySecond(...), listSecond(...), etc.
${#temporals.nanosecond(temporal)}             // also arrayNanosecond(...), listNanosecond(...), etc.

/*
 * Create temporal (java.time.Temporal) objects from its components
 */
${#temporals.create(year,month,day)}                                // return a instance of java.time.LocalDate
${#temporals.create(year,month,day,hour,minute)}                    // return a instance of java.time.LocalDateTime
${#temporals.create(year,month,day,hour,minute,second)}             // return a instance of java.time.LocalDateTime
${#temporals.create(year,month,day,hour,minute,second,nanosecond)}  // return a instance of java.time.LocalDateTime

/*
 * Create a temporal (java.time.Temporal) object for the current date and time
 */
${#temporals.createNow()}                      // return a instance of java.time.LocalDateTime
${#temporals.createNowForTimeZone(zoneId)}     // return a instance of java.time.ZonedDateTime
${#temporals.createToday()}                    // return a instance of java.time.LocalDate
${#temporals.createTodayForTimeZone(zoneId)}   // return a instance of java.time.LocalDate

/*
 * Create a temporal (java.time.Temporal) object for the provided date
 */
${#temporals.createDate(isoDate)}              // return a instance of java.time.LocalDate
${#temporals.createDateTime(isoDate)}          // return a instance of java.time.LocalDateTime
${#temporals.createDate(isoDate, pattern)}     // return a instance of java.time.LocalDate
${#temporals.createDateTime(isoDate, pattern)} // return a instance of java.time.LocalDateTime
숫자 (Numbers)
- #numbers : utility methods for number objects:
/*
 * ======================================================================
 * See javadoc API for class org.thymeleaf.expression.Numbers
 * ======================================================================
 */

/*
 * ==========================
 * Formatting integer numbers
 * ==========================
 */

/*
 * Set minimum integer digits.
 * Also works with arrays, lists or sets
 */
${#numbers.formatInteger(num,3)}
${#numbers.arrayFormatInteger(numArray,3)}
${#numbers.listFormatInteger(numList,3)}
${#numbers.setFormatInteger(numSet,3)}


/*
 * Set minimum integer digits and thousands separator:
 * 'POINT', 'COMMA', 'WHITESPACE', 'NONE' or 'DEFAULT' (by locale).
 * Also works with arrays, lists or sets
 */
${#numbers.formatInteger(num,3,'POINT')}
${#numbers.arrayFormatInteger(numArray,3,'POINT')}
${#numbers.listFormatInteger(numList,3,'POINT')}
${#numbers.setFormatInteger(numSet,3,'POINT')}


/*
 * ==========================
 * Formatting decimal numbers
 * ==========================
 */

/*
 * Set minimum integer digits and (exact) decimal digits.
 * Also works with arrays, lists or sets
 */
${#numbers.formatDecimal(num,3,2)}
${#numbers.arrayFormatDecimal(numArray,3,2)}
${#numbers.listFormatDecimal(numList,3,2)}
${#numbers.setFormatDecimal(numSet,3,2)}

/*
 * Set minimum integer digits and (exact) decimal digits, and also decimal separator.
 * Also works with arrays, lists or sets
 */
${#numbers.formatDecimal(num,3,2,'COMMA')}
${#numbers.arrayFormatDecimal(numArray,3,2,'COMMA')}
${#numbers.listFormatDecimal(numList,3,2,'COMMA')}
${#numbers.setFormatDecimal(numSet,3,2,'COMMA')}

/*
 * Set minimum integer digits and (exact) decimal digits, and also thousands and
 * decimal separator.
 * Also works with arrays, lists or sets
 */
${#numbers.formatDecimal(num,3,'POINT',2,'COMMA')}
${#numbers.arrayFormatDecimal(numArray,3,'POINT',2,'COMMA')}
${#numbers.listFormatDecimal(numList,3,'POINT',2,'COMMA')}
${#numbers.setFormatDecimal(numSet,3,'POINT',2,'COMMA')}


/*
 * =====================
 * Formatting currencies
 * =====================
 */

${#numbers.formatCurrency(num)}
${#numbers.arrayFormatCurrency(numArray)}
${#numbers.listFormatCurrency(numList)}
${#numbers.setFormatCurrency(numSet)}


/*
 * ======================
 * Formatting percentages
 * ======================
 */

${#numbers.formatPercent(num)}
${#numbers.arrayFormatPercent(numArray)}
${#numbers.listFormatPercent(numList)}
${#numbers.setFormatPercent(numSet)}

/*
 * Set minimum integer digits and (exact) decimal digits.
 */
${#numbers.formatPercent(num, 3, 2)}
${#numbers.arrayFormatPercent(numArray, 3, 2)}
${#numbers.listFormatPercent(numList, 3, 2)}
${#numbers.setFormatPercent(numSet, 3, 2)}


/*
 * ===============
 * Utility methods
 * ===============
 */

/*
 * Create a sequence (array) of integer numbers going
 * from x to y
 */
${#numbers.sequence(from,to)}
${#numbers.sequence(from,to,step)}
문자열 (Strings)
- #strings : utility methods for
Stringobjects:
/*
 * ======================================================================
 * See javadoc API for class org.thymeleaf.expression.Strings
 * ======================================================================
 */

/*
 * Null-safe toString()
 */
${#strings.toString(obj)}                           // also array*, list* and set*

/*
 * Check whether a String is empty (or null). Performs a trim() operation before check
 * Also works with arrays, lists or sets
 */
${#strings.isEmpty(name)}
${#strings.arrayIsEmpty(nameArr)}
${#strings.listIsEmpty(nameList)}
${#strings.setIsEmpty(nameSet)}

/*
 * Perform an 'isEmpty()' check on a string and return it if false, defaulting to
 * another specified string if true.
 * Also works with arrays, lists or sets
 */
${#strings.defaultString(text,default)}
${#strings.arrayDefaultString(textArr,default)}
${#strings.listDefaultString(textList,default)}
${#strings.setDefaultString(textSet,default)}

/*
 * Check whether a fragment is contained in a String
 * Also works with arrays, lists or sets
 */
${#strings.contains(name,'ez')}                     // also array*, list* and set*
${#strings.containsIgnoreCase(name,'ez')}           // also array*, list* and set*

/*
 * Check whether a String starts or ends with a fragment
 * Also works with arrays, lists or sets
 */
${#strings.startsWith(name,'Don')}                  // also array*, list* and set*
${#strings.endsWith(name,endingFragment)}           // also array*, list* and set*

/*
 * Substring-related operations
 * Also works with arrays, lists or sets
 */
${#strings.indexOf(name,frag)}                      // also array*, list* and set*
${#strings.substring(name,3,5)}                     // also array*, list* and set*
${#strings.substringAfter(name,prefix)}             // also array*, list* and set*
${#strings.substringBefore(name,suffix)}            // also array*, list* and set*
${#strings.replace(name,'las','ler')}               // also array*, list* and set*

/*
 * Append and prepend
 * Also works with arrays, lists or sets
 */
${#strings.prepend(str,prefix)}                     // also array*, list* and set*
${#strings.append(str,suffix)}                      // also array*, list* and set*

/*
 * Change case
 * Also works with arrays, lists or sets
 */
${#strings.toUpperCase(name)}                       // also array*, list* and set*
${#strings.toLowerCase(name)}                       // also array*, list* and set*

/*
 * Split and join
 */
${#strings.arrayJoin(namesArray,',')}
${#strings.listJoin(namesList,',')}
${#strings.setJoin(namesSet,',')}
${#strings.arraySplit(namesStr,',')}                // returns String[]
${#strings.listSplit(namesStr,',')}                 // returns List<String>
${#strings.setSplit(namesStr,',')}                  // returns Set<String>

/*
 * Trim
 * Also works with arrays, lists or sets
 */
${#strings.trim(str)}                               // also array*, list* and set*

/*
 * Compute length
 * Also works with arrays, lists or sets
 */
${#strings.length(str)}                             // also array*, list* and set*

/*
 * Abbreviate text making it have a maximum size of n. If text is bigger, it
 * will be clipped and finished in "..."
 * Also works with arrays, lists or sets
 */
${#strings.abbreviate(str,10)}                      // also array*, list* and set*

/*
 * Convert the first character to upper-case (and vice-versa)
 */
${#strings.capitalize(str)}                         // also array*, list* and set*
${#strings.unCapitalize(str)}                       // also array*, list* and set*

/*
 * Convert the first character of every word to upper-case
 */
${#strings.capitalizeWords(str)}                    // also array*, list* and set*
${#strings.capitalizeWords(str,delimiters)}         // also array*, list* and set*

/*
 * Escape the string
 */
${#strings.escapeXml(str)}                          // also array*, list* and set*
${#strings.escapeJava(str)}                         // also array*, list* and set*
${#strings.escapeJavaScript(str)}                   // also array*, list* and set*
${#strings.unescapeJava(str)}                       // also array*, list* and set*
${#strings.unescapeJavaScript(str)}                 // also array*, list* and set*

/*
 * Null-safe comparison and concatenation
 */
${#strings.equals(first, second)}
${#strings.equalsIgnoreCase(first, second)}
${#strings.concat(values...)}
${#strings.concatReplaceNulls(nullValue, values...)}

/*
 * Random
 */
${#strings.randomAlphanumeric(count)}
객체 (Objects)
- #objects : utility methods for objects in general
/*
 * ======================================================================
 * See javadoc API for class org.thymeleaf.expression.Objects
 * ======================================================================
 */

/*
 * Return obj if it is not null, and default otherwise
 * Also works with arrays, lists or sets
 */
${#objects.nullSafe(obj,default)}
${#objects.arrayNullSafe(objArray,default)}
${#objects.listNullSafe(objList,default)}
${#objects.setNullSafe(objSet,default)}
불리언 (Boolean)
- #bools : utility methods for boolean evaluation
/*
 * ======================================================================
 * See javadoc API for class org.thymeleaf.expression.Bools
 * ======================================================================
 */

/*
 * Evaluate a condition in the same way that it would be evaluated in a th:if tag
 * (see conditional evaluation chapter afterwards).
 * Also works with arrays, lists or sets
 */
${#bools.isTrue(obj)}
${#bools.arrayIsTrue(objArray)}
${#bools.listIsTrue(objList)}
${#bools.setIsTrue(objSet)}

/*
 * Evaluate with negation
 * Also works with arrays, lists or sets
 */
${#bools.isFalse(cond)}
${#bools.arrayIsFalse(condArray)}
${#bools.listIsFalse(condList)}
${#bools.setIsFalse(condSet)}

/*
 * Evaluate and apply AND operator
 * Receive an array, a list or a set as parameter
 */
${#bools.arrayAnd(condArray)}
${#bools.listAnd(condList)}
${#bools.setAnd(condSet)}

/*
 * Evaluate and apply OR operator
 * Receive an array, a list or a set as parameter
 */
${#bools.arrayOr(condArray)}
${#bools.listOr(condList)}
${#bools.setOr(condSet)}
배열 (Arrays)
- #arrays : utility methods for arrays
/*
 * ======================================================================
 * See javadoc API for class org.thymeleaf.expression.Arrays
 * ======================================================================
 */

/*
 * Converts to array, trying to infer array component class.
 * Note that if resulting array is empty, or if the elements
 * of the target object are not all of the same class,
 * this method will return Object[].
 */
${#arrays.toArray(object)}

/*
 * Convert to arrays of the specified component class.
 */
${#arrays.toStringArray(object)}
${#arrays.toIntegerArray(object)}
${#arrays.toLongArray(object)}
${#arrays.toDoubleArray(object)}
${#arrays.toFloatArray(object)}
${#arrays.toBooleanArray(object)}

/*
 * Compute length
 */
${#arrays.length(array)}

/*
 * Check whether array is empty
 */
${#arrays.isEmpty(array)}

/*
 * Check if element or elements are contained in array
 */
${#arrays.contains(array, element)}
${#arrays.containsAll(array, elements)}
리스트 (Lists)
- #lists : utility methods for lists
/*
 * ======================================================================
 * See javadoc API for class org.thymeleaf.expression.Lists
 * ======================================================================
 */

/*
 * Converts to list
 */
${#lists.toList(object)}

/*
 * Compute size
 */
${#lists.size(list)}

/*
 * Check whether list is empty
 */
${#lists.isEmpty(list)}

/*
 * Check if element or elements are contained in list
 */
${#lists.contains(list, element)}
${#lists.containsAll(list, elements)}

/*
 * Sort a copy of the given list. The members of the list must implement
 * comparable or you must define a comparator.
 */
${#lists.sort(list)}
${#lists.sort(list, comparator)}
집합 (Sets)
- #sets : utility methods for sets
/*
 * ======================================================================
 * See javadoc API for class org.thymeleaf.expression.Sets
 * ======================================================================
 */

/*
 * Converts to set
 */
${#sets.toSet(object)}

/*
 * Compute size
 */
${#sets.size(set)}

/*
 * Check whether set is empty
 */
${#sets.isEmpty(set)}

/*
 * Check if element or elements are contained in set
 */
${#sets.contains(set, element)}
${#sets.containsAll(set, elements)}
맵 (Maps)
- #maps : utility methods for maps
/*
 * ======================================================================
 * See javadoc API for class org.thymeleaf.expression.Maps
 * ======================================================================
 */

/*
 * Compute size
 */
${#maps.size(map)}

/*
 * Check whether map is empty
 */
${#maps.isEmpty(map)}

/*
 * Check if key/s or value/s are contained in maps
 */
${#maps.containsKey(map, key)}
${#maps.containsAllKeys(map, keys)}
${#maps.containsValue(map, value)}
${#maps.containsAllValues(map, value)}
집계 (Aggregates)
- #aggregates : utility methods for creating aggregates on arrays or collections
/*
 * ======================================================================
 * See javadoc API for class org.thymeleaf.expression.Aggregates
 * ======================================================================
 */

/*
 * Compute sum. Returns null if array or collection is empty
 */
${#aggregates.sum(array)}
${#aggregates.sum(collection)}

/*
 * Compute average. Returns null if array or collection is empty
 */
${#aggregates.avg(array)}
${#aggregates.avg(collection)}
IDs
- #ids : utility methods for dealing with
idattributes that might be repeated (for example, as a result of an iteration).
/*
 * ======================================================================
 * See javadoc API for class org.thymeleaf.expression.Ids
 * ======================================================================
 */

/*
 * Normally used in th:id attributes, for appending a counter to the id attribute value
 * so that it remains unique even when involved in an iteration process.
 */
${#ids.seq('someId')}

/*
 * Normally used in th:for attributes in <label> tags, so that these labels can refer to Ids
 * generated by means if the #ids.seq(...) function.
 *
 * Depending on whether the <label> goes before or after the element with the #ids.seq(...)
 * function, the "next" (label goes before "seq") or the "prev" function (label goes after
 * "seq") function should be called.
 */
${#ids.next('someId')}
${#ids.prev('someId')}
20 부록 C: 마크업 선택자 구문
Thymeleaf’s Markup Selectors are directly borrowed from Thymeleaf’s parsing library: AttoParser.
The syntax for this selectors has large similarities with that of selectors in XPath, CSS and jQuery, which makes them easy to use for most users. You can have a look at the complete syntax reference at the AttoParser documentation.
For example, the following selector will select every <div> with the class content, in every position inside the markup (note this is not as concise as it could be, read on to know why):
<div th:insert="~{mytemplate :: //div[@class='content']}">...</div>The basic syntax includes:
/xmeans direct children of the current node with name x.//xmeans children of the current node with name x, at any depth.x[@z="v"]means elements with name x and an attribute called z with value “v”.x[@z1="v1" and @z2="v2"]means elements with name x and attributes z1 and z2 with values “v1” and “v2”, respectively.x[i]means element with name x positioned in number i among its siblings.x[@z="v"][i]means elements with name x, attribute z with value “v” and positioned in number i among its siblings that also match this condition.
But more concise syntax can also be used:
xis exactly equivalent to//x(search an element with name or referencexat any depth level, a reference being ath:refor ath:fragmentattribute).Selectors are also allowed without element name/reference, as long as they include a specification of arguments. So
[@class='oneclass']is a valid selector that looks for any elements (tags) with a class attribute with value"oneclass".
Advanced attribute selection features:
Besides
=(equal), other comparison operators are also valid:!=(not equal),^=(starts with) and$=(ends with). For example:x[@class^='section']means elements with namexand a value for attributeclassthat starts withsection.Attributes can be specified both starting with
@(XPath-style) and without (jQuery-style). Sox[z='v']is equivalent tox[@z='v'].Multiple-attribute modifiers can be joined both with
and(XPath-style) and also by chaining multiple modifiers (jQuery-style). Sox[@z1='v1' and @z2='v2']is actually equivalent tox[@z1='v1'][@z2='v2'](and also tox[z1='v1'][z2='v2']).
Direct jQuery-like selectors:
x.oneclassis equivalent tox[class='oneclass']..oneclassis equivalent to[class='oneclass'].x#oneidis equivalent tox[id='oneid'].#oneidis equivalent to[id='oneid'].x%onerefmeans<x>tags that have ath:ref="oneref"orth:fragment="oneref"attribute.%onerefmeans any tags that have ath:ref="oneref"orth:fragment="oneref"attribute. Note this is actually equivalent to simplyonerefbecause references can be used instead of element names.Direct selectors and attribute selectors can be mixed:
a.external[@href^='https'].
So the above Markup Selector expression:
<div th:insert="~{mytemplate :: //div[@class='content']}">...</div>Could be written as:
<div th:insert="~{mytemplate :: div.content}">...</div>Examining a different example, this:
<div th:replace="~{mytemplate :: myfrag}">...</div>Will look for a th:fragment="myfrag" fragment signature (or th:ref references). But would also look for tags with name myfrag if they existed (which they don’t, in HTML). Note the difference with:
<div th:replace="~{mytemplate :: .myfrag}">...</div>…which will actually look for any elements with class="myfrag", without caring about th:fragment signatures (or th:ref references).
다중 값 클래스 매칭
Markup Selectors understand the class attribute to be multivalued, and therefore allow the application of selectors on this attribute even if the element has several class values.
For example, div.two will match <div class="one two three" />